-- this article has been FROZEN as of 9-15-06 and submitted for publication.
-- due 9-16-06 to Ginny Randall (Ginny.Randall at charter dot net)
This page is http://morro-bay.com/digitalchocolate/howto which is the same as http://morro-bay.com/digitalchocolate/howto/ or http://morro-bay.com/digitalchocolate/howto//
Submit comments, corrections, suggestions to mike at mikebaird dot com.
The online version of this article may be longer and contain more photos and resources than the printed version.
Notes to CCNHA Nature Notes editor for print version:
* Hyperlinks below (shown as underlined sections) should not appear as underlined
* Do not print the text "(click thumbnail above to see full-sized version)"
* Do not print "...wallpaper version"
* Do not print "(A higher resolution print version for Natures Notes newsletter will be sent upon request to the Production Editor from the author)"
* Do not print "For CCNHA print publication only => uncropped 1476x1121 original .tif and enhanced .tif <= very large files"
* Replace all masked e-mail addresses such as "name at isp dot com" with name@isp.com
* Click photo "thumbnails" to access higher-resolution versions for best print quality
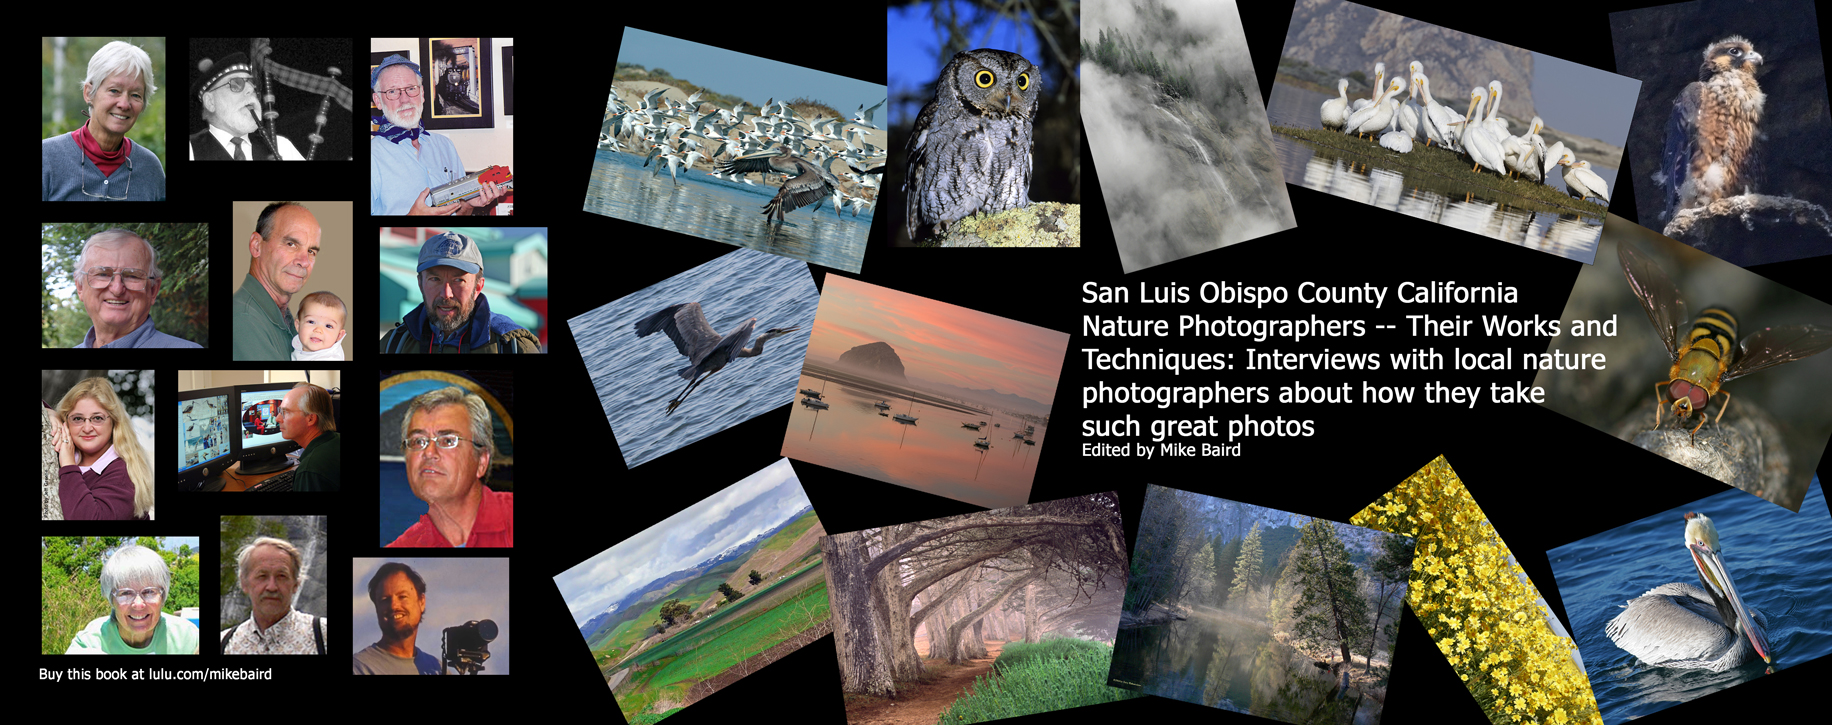
The above is a proposed book cover design for an expanded version of the following content, to be published at LuLu.com/mikebaird
(Draft versions may appear here => Word document (60+ MB); PDF version -rev'd 9-23-06 (16.3+ MB)) (older 9-19-06 obsolete PDF version for ref
9-24-06: You can now download the PDF version of the book for free from LuLu.com/mikebaird - printed version will appear ~10-10-06 after proof version is approved)
This 38-page 9" x 7" color paperback book will be available to purchase at cost -- about $10
** begin printed version of article ***
Interviews with local nature photographers about how they take such great photos
Edited by Docent Mike Baird -- mike at mikebaird dot com
 The
SLO County area of California is rewarded by the presence
of many skilled and sharing local nature photographers. Many of the
photographers interviewed for this article will be familiar to CCNHA
Nature Notes readers, as they have exhibited their works before in the
Morro Bay Museum of
Natural History and related
community
programs. More and more everyday people are becoming interested in
photography -- especially since the advent of low-cost high-quality
digital cameras, and the ability to share photos and experiences across
the Internet. Taking photographs can be a source of
inspiration and an expression of one's artistic abilities. Many docents
are now using photographs, taken by themselves or other docents, to help
support their
Adventures with Nature Walks,
Living History
performances, and related
exhibits and
activities. When we see a photo
that we really like, we
all want to know "how did the photographer get such a good photo?" Well,
to help answer that question, I interviewed many of our local photographers,
with reputations ranging from "beginner" to "worldwide expert," and
this is what some of them said.
The
SLO County area of California is rewarded by the presence
of many skilled and sharing local nature photographers. Many of the
photographers interviewed for this article will be familiar to CCNHA
Nature Notes readers, as they have exhibited their works before in the
Morro Bay Museum of
Natural History and related
community
programs. More and more everyday people are becoming interested in
photography -- especially since the advent of low-cost high-quality
digital cameras, and the ability to share photos and experiences across
the Internet. Taking photographs can be a source of
inspiration and an expression of one's artistic abilities. Many docents
are now using photographs, taken by themselves or other docents, to help
support their
Adventures with Nature Walks,
Living History
performances, and related
exhibits and
activities. When we see a photo
that we really like, we
all want to know "how did the photographer get such a good photo?" Well,
to help answer that question, I interviewed many of our local photographers,
with reputations ranging from "beginner" to "worldwide expert," and
this is what some of them said.
Photo © Joyce Cory
(click thumbnail above to see full-sized version)
Villa Creek, by Joyce Cory
1024x768 wallpaper version
Joyce Cory, a State Park Docent that many of us know, and retired teacher, is new to digital photography, and has made great strides in a short period of time. If she is not performing Living History at the Spooner Ranch House in Montaña de Oro State Park, she is out birding and photographing. Joyce said, "I purchased my camera, a Panasonic DMC-FZ3 with a 12x zoom for the purpose of using the photos on my websites, docentjoyce.com and birdinglady.com. My camera is my constant companion. I am frequently updating my websites and need related photos, particularly on my Birding Lady Birding Blog at blog.birdinglady.com. Since my camera is far from 'state-of-the-art,' I try for interesting subject matter and the right light, as shown in my photo entitled Villa Creek. I prefer a balanced photo and when possible I frame a scene through vegetation. I have found that a digital camera comes in very handy for identifying birds. Seconds after I click the shutter, the photo is available to look at using the zoom review feature. I can't imagine how I ever got along without my precious camera." Joyce is being modest in her claims. In less than one and a half years she has learned how to take good nature photos, acquired two Windows computers on which she runs Adobe Photoshop Elements image enhancement software and Microsoft FrontPage 2003 web-crafting software. She maintains several websites this way, and is responsible for many of the highly graphic educational exhibits at the Montaña de Oro State Park Ranch House. You can contact Joyce Cory at docentjoyce at yahoo dot com.

Photo © Joe Dickerson
(click thumbnail above to see full-sized version)
White Pelicans Panorama, by Joe Dickerson
1024x768 wallpaper version
1280x1024 wallpaper version
1600x1200 wallpaper version
1920x1200 wide-screen wallpaper version
(1600x861 .tif version, optional for CCNHA print editor)
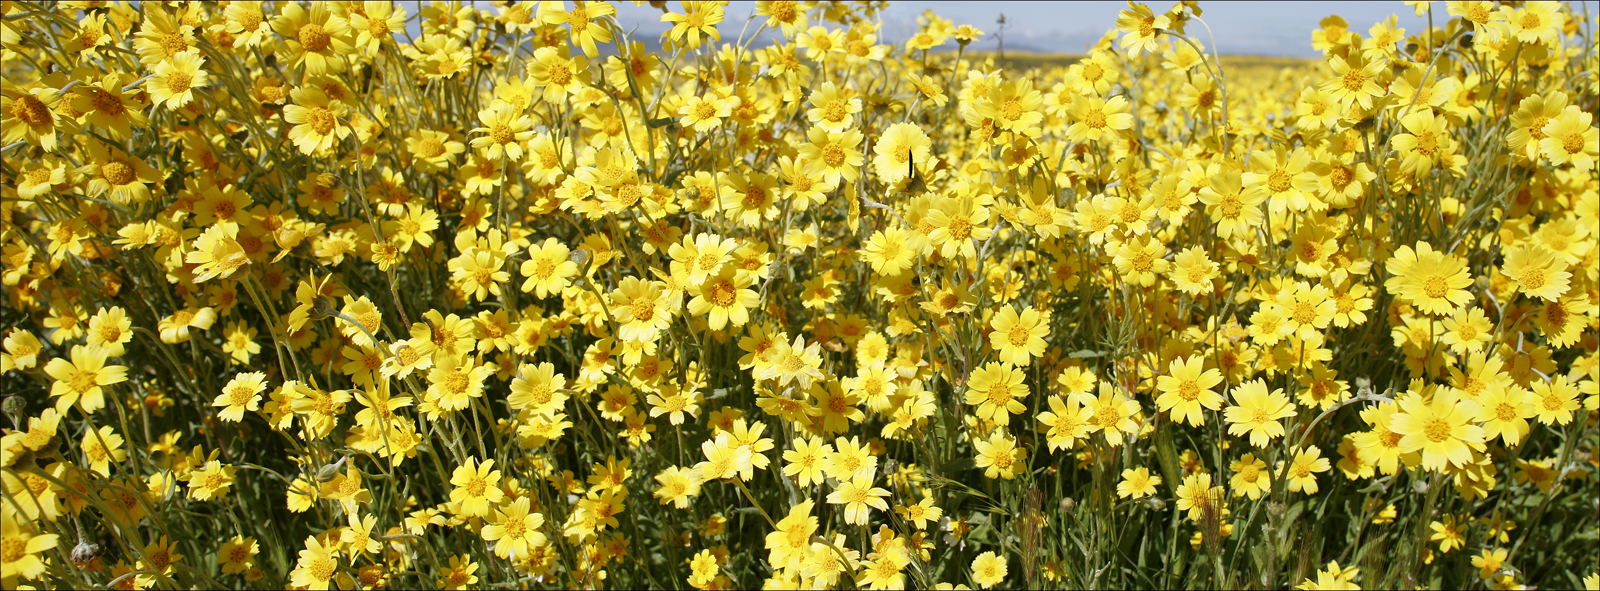
Photo © Joe Dickerson
(click thumbnail above to see full-sized version)
Monolopia Panorama, by Joe Dickerson
1024x768 wallpaper version
1280x1024 wallpaper version
1600x1200 wallpaper version
1920x1200 wide-screen wallpaper version
(1600x591
.tif version, optional for CCNHA print editor)
 Joe Dickerson
has been a professional photographer for nearly 40 years, although
nature photography is not how he makes his living. He has published
extensively in
Shutterbug and other
photo magazines. He is a multi-talented
individual who has even been known to serenade us at local Sierra Club camp-outs
with
his bagpipe music (photo by Gary Robertshaw). Joe discusses below his
latest interest -- Shooting for Panoramas, A Stitch in Time. "Nature photography is a continuing thread that weaves its way
throughout my photographic life. I mostly shoot film but have been
shooting digitally for the past couple of years and really enjoy the
versatility of the digital workflow. I have been fascinated with
panoramic images for as long as I can remember but never convinced
myself that I should spend several thousands of dollars on a dedicated
panoramic camera. But now, with digital images, either shot on my
digital SLR or on a film camera and scanned into the computer, I can
easily create panos that rival images shot on the most expensive
panoramic cameras. I use a fantastic software program called
Panorama Maker 3 (just upgraded to
version 4) from
Arcsoft. This is the easiest and most intuitive software I
have tried for stitching panoramas but there are several others on the
market and of course you can also accomplish the same thing in Photoshop
and many other image processing software packages. While there
isn’t space here to go completely through the step by step processing of
a pano, let me share some things I have learned, mostly the hard way,
about shooting images that will later be stitched in the computer.
First, make certain that your camera is perfectly level. The easiest way
to accomplish this is on a tripod using a bubble level on top of the
camera. Bubble levels that fit your camera’s hot shoe are
available at most camera stores. My panos are usually from three
to six images wide depending on the subject, and I’ll frequently have the
camera oriented for a vertical shot even though the eventual image will
be a horizontal composition. This allows you to use a telephoto
lens if you prefer, as I did, for the white pelican image. By the
way, my photo entitled White Pelicans Panorama, was shot hand-held from a kayak with a 300mm lens, so
a tripod is not absolutely necessary even though I prefer to use one
when I can. Next, rehearse your panning several times if possible.
I try to shoot the whole sequence at least twice just to be safe when
the subject will allow it. Create at least a 20 percent overlap of
the images, more if you’re using a wide-angle lens. Generous
overlap will make the stitching process much smoother regardless of the
software you’ll be using later. Watch as you run through the
panning that the horizon doesn’t start to tilt at some point. This
will make the stitching much more difficult and can result in total
failure. I am usually an advocate of polarizing filters for scenic
photographs but do not, I repeat, do not use a polarizing filter when
shooting panoramas. Your sky will be uneven and the resulting
images will not stitch together convincingly, if at all. Practice,
practice, practice! By getting the procedure down on simple
subjects that don’t move you can more easily handle the challenging
compositions when they occur. My last bit of advice is to be open
to the possibilities. Just because you’re doing panoramas don’t
limit yourself only to the grand landscape. Wildlife and close-up
subjects are fair game as well. I’ll look for you on the bay!"
You can contact Joe Dickerson at JADPhoto at aol dot
com.
Joe Dickerson
has been a professional photographer for nearly 40 years, although
nature photography is not how he makes his living. He has published
extensively in
Shutterbug and other
photo magazines. He is a multi-talented
individual who has even been known to serenade us at local Sierra Club camp-outs
with
his bagpipe music (photo by Gary Robertshaw). Joe discusses below his
latest interest -- Shooting for Panoramas, A Stitch in Time. "Nature photography is a continuing thread that weaves its way
throughout my photographic life. I mostly shoot film but have been
shooting digitally for the past couple of years and really enjoy the
versatility of the digital workflow. I have been fascinated with
panoramic images for as long as I can remember but never convinced
myself that I should spend several thousands of dollars on a dedicated
panoramic camera. But now, with digital images, either shot on my
digital SLR or on a film camera and scanned into the computer, I can
easily create panos that rival images shot on the most expensive
panoramic cameras. I use a fantastic software program called
Panorama Maker 3 (just upgraded to
version 4) from
Arcsoft. This is the easiest and most intuitive software I
have tried for stitching panoramas but there are several others on the
market and of course you can also accomplish the same thing in Photoshop
and many other image processing software packages. While there
isn’t space here to go completely through the step by step processing of
a pano, let me share some things I have learned, mostly the hard way,
about shooting images that will later be stitched in the computer.
First, make certain that your camera is perfectly level. The easiest way
to accomplish this is on a tripod using a bubble level on top of the
camera. Bubble levels that fit your camera’s hot shoe are
available at most camera stores. My panos are usually from three
to six images wide depending on the subject, and I’ll frequently have the
camera oriented for a vertical shot even though the eventual image will
be a horizontal composition. This allows you to use a telephoto
lens if you prefer, as I did, for the white pelican image. By the
way, my photo entitled White Pelicans Panorama, was shot hand-held from a kayak with a 300mm lens, so
a tripod is not absolutely necessary even though I prefer to use one
when I can. Next, rehearse your panning several times if possible.
I try to shoot the whole sequence at least twice just to be safe when
the subject will allow it. Create at least a 20 percent overlap of
the images, more if you’re using a wide-angle lens. Generous
overlap will make the stitching process much smoother regardless of the
software you’ll be using later. Watch as you run through the
panning that the horizon doesn’t start to tilt at some point. This
will make the stitching much more difficult and can result in total
failure. I am usually an advocate of polarizing filters for scenic
photographs but do not, I repeat, do not use a polarizing filter when
shooting panoramas. Your sky will be uneven and the resulting
images will not stitch together convincingly, if at all. Practice,
practice, practice! By getting the procedure down on simple
subjects that don’t move you can more easily handle the challenging
compositions when they occur. My last bit of advice is to be open
to the possibilities. Just because you’re doing panoramas don’t
limit yourself only to the grand landscape. Wildlife and close-up
subjects are fair game as well. I’ll look for you on the bay!"
You can contact Joe Dickerson at JADPhoto at aol dot
com.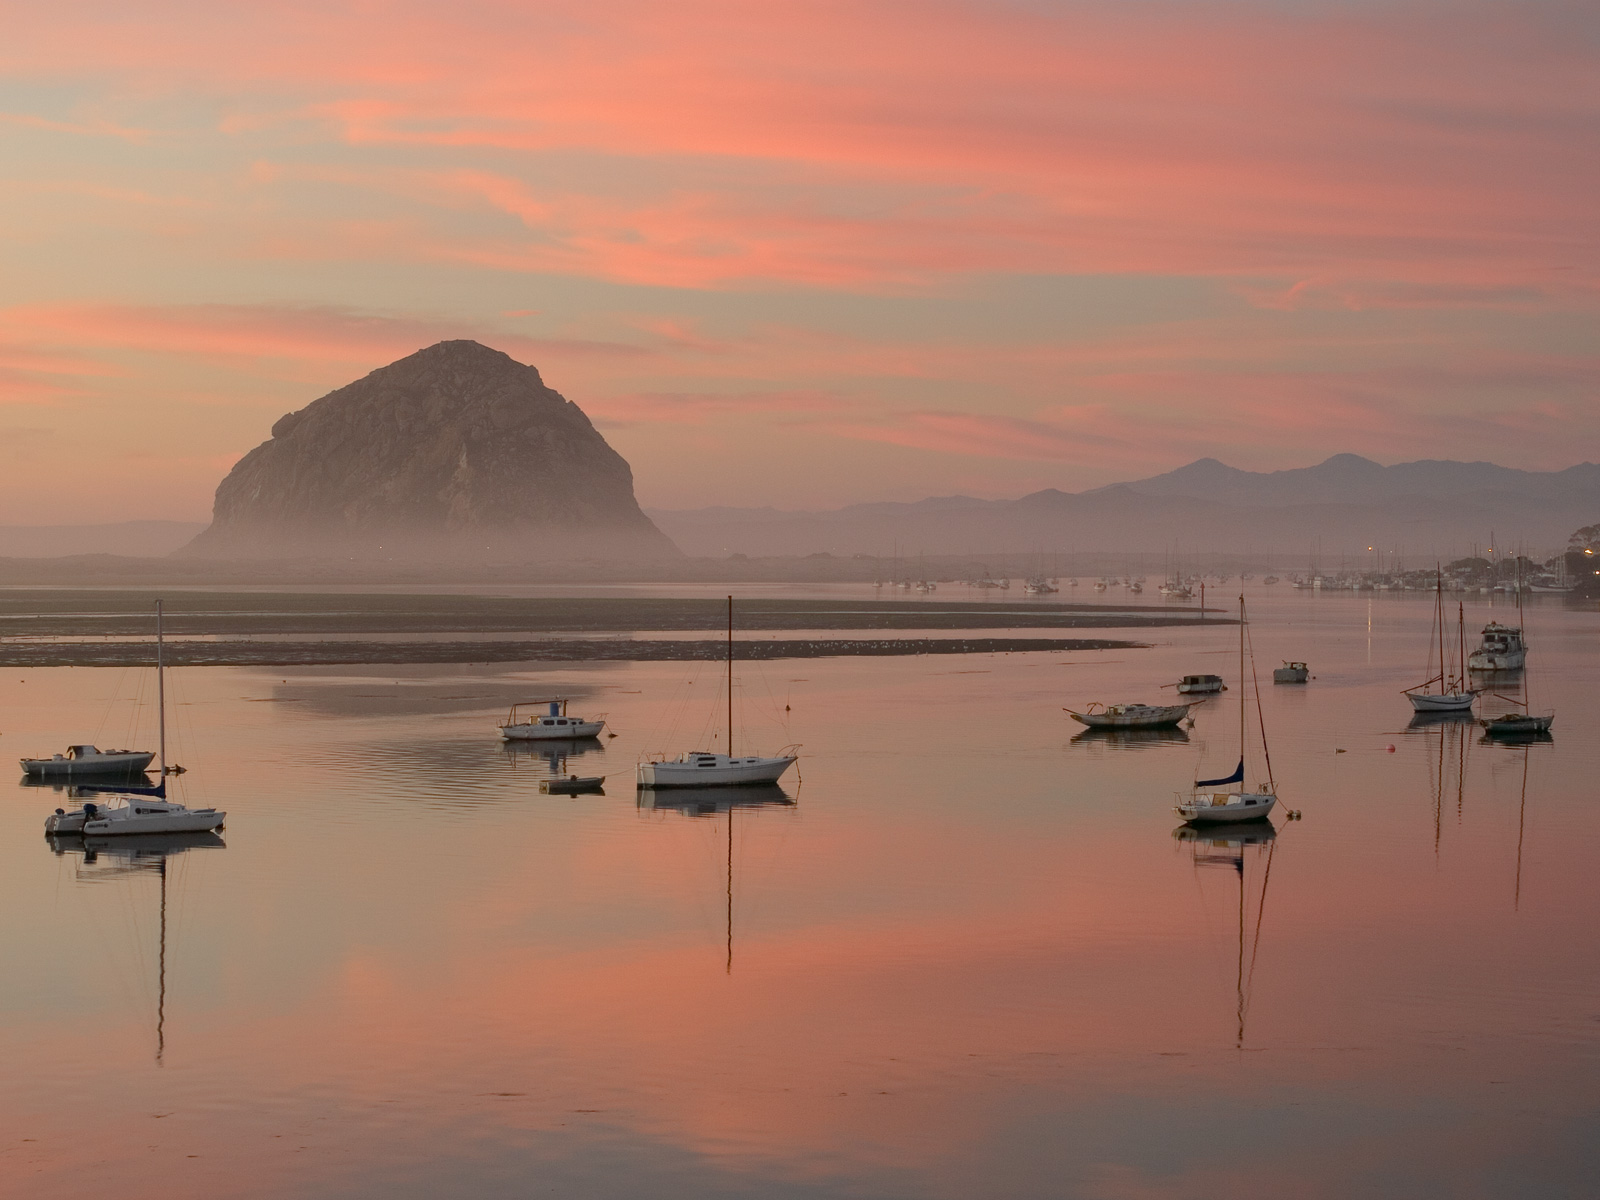
Photo © Carol DiNolfo / caroldinolfo.com
(click thumbnail above to see full-sized version)
Last Light, by Carol DiNolfo
1024x768 wallpaper version
1280x1024 wallpaper version
(A higher resolution print version for Natures Notes newsletter will be sent upon request to the Production Editor from the author)
 Carol DiNolfo, a System Engineer at
the Jet Propulsion Laboratory for more than 22 years, escaped from L.A.
in 2002 to enjoy the Central Coast lifestyle. A serious amateur
photographer and Photoshop pro, Carol focuses her Canon EOS 20D on the
scenic landscapes of this beautiful area. Her images are on
display on her website at
caroldinolfo.com
and at the Gallery at Marina Square on the Morro Bay Embarcadero.
Carol has this advice for aspiring photographers: "In photography,
light and shadow are everything. The best time to photograph is
usually in the early morning or late afternoon, when shadows are long
and soft, and the light glows in shades of yellow and pink. It
takes longer to expose a photo in these few golden hours than it does in
the bright sun in the middle of the day. To capture the scene in
crisp focus you have to make sure the camera does not move as you press
the shutter. Unless you happen to have image-stabilized technology
in your camera gear, hand-holding the camera is not going to give you
satisfactory results. For tack-sharp images, it is essential to
steady your camera on a tripod or to place your camera on a solid
platform, like a table, wall or fence. One of my favorite local
scenes is Morro Rock basking in a gorgeous sunset. Whenever I
think a good sunset is developing, I grab my tripod and my camera gear
and rush over to my 'secret' spot – the landing at the Morro Bay Museum
of Natural History – and take pictures until the light is gone, as in my
photo entitled Last Light. Here, mist drifts around Morro Rock as the clouds turn
pink in the sunset and reflect in the calm waters of the bay filled with
moored boats. Taken with a Canon EOS 20D, 28-135 mm zoom lens at 48 mm, 0.4
sec at f/11, ISO 200."
You can contact Carol DiNolfo at silverdove at charter dot net.
Carol DiNolfo, a System Engineer at
the Jet Propulsion Laboratory for more than 22 years, escaped from L.A.
in 2002 to enjoy the Central Coast lifestyle. A serious amateur
photographer and Photoshop pro, Carol focuses her Canon EOS 20D on the
scenic landscapes of this beautiful area. Her images are on
display on her website at
caroldinolfo.com
and at the Gallery at Marina Square on the Morro Bay Embarcadero.
Carol has this advice for aspiring photographers: "In photography,
light and shadow are everything. The best time to photograph is
usually in the early morning or late afternoon, when shadows are long
and soft, and the light glows in shades of yellow and pink. It
takes longer to expose a photo in these few golden hours than it does in
the bright sun in the middle of the day. To capture the scene in
crisp focus you have to make sure the camera does not move as you press
the shutter. Unless you happen to have image-stabilized technology
in your camera gear, hand-holding the camera is not going to give you
satisfactory results. For tack-sharp images, it is essential to
steady your camera on a tripod or to place your camera on a solid
platform, like a table, wall or fence. One of my favorite local
scenes is Morro Rock basking in a gorgeous sunset. Whenever I
think a good sunset is developing, I grab my tripod and my camera gear
and rush over to my 'secret' spot – the landing at the Morro Bay Museum
of Natural History – and take pictures until the light is gone, as in my
photo entitled Last Light. Here, mist drifts around Morro Rock as the clouds turn
pink in the sunset and reflect in the calm waters of the bay filled with
moored boats. Taken with a Canon EOS 20D, 28-135 mm zoom lens at 48 mm, 0.4
sec at f/11, ISO 200."
You can contact Carol DiNolfo at silverdove at charter dot net.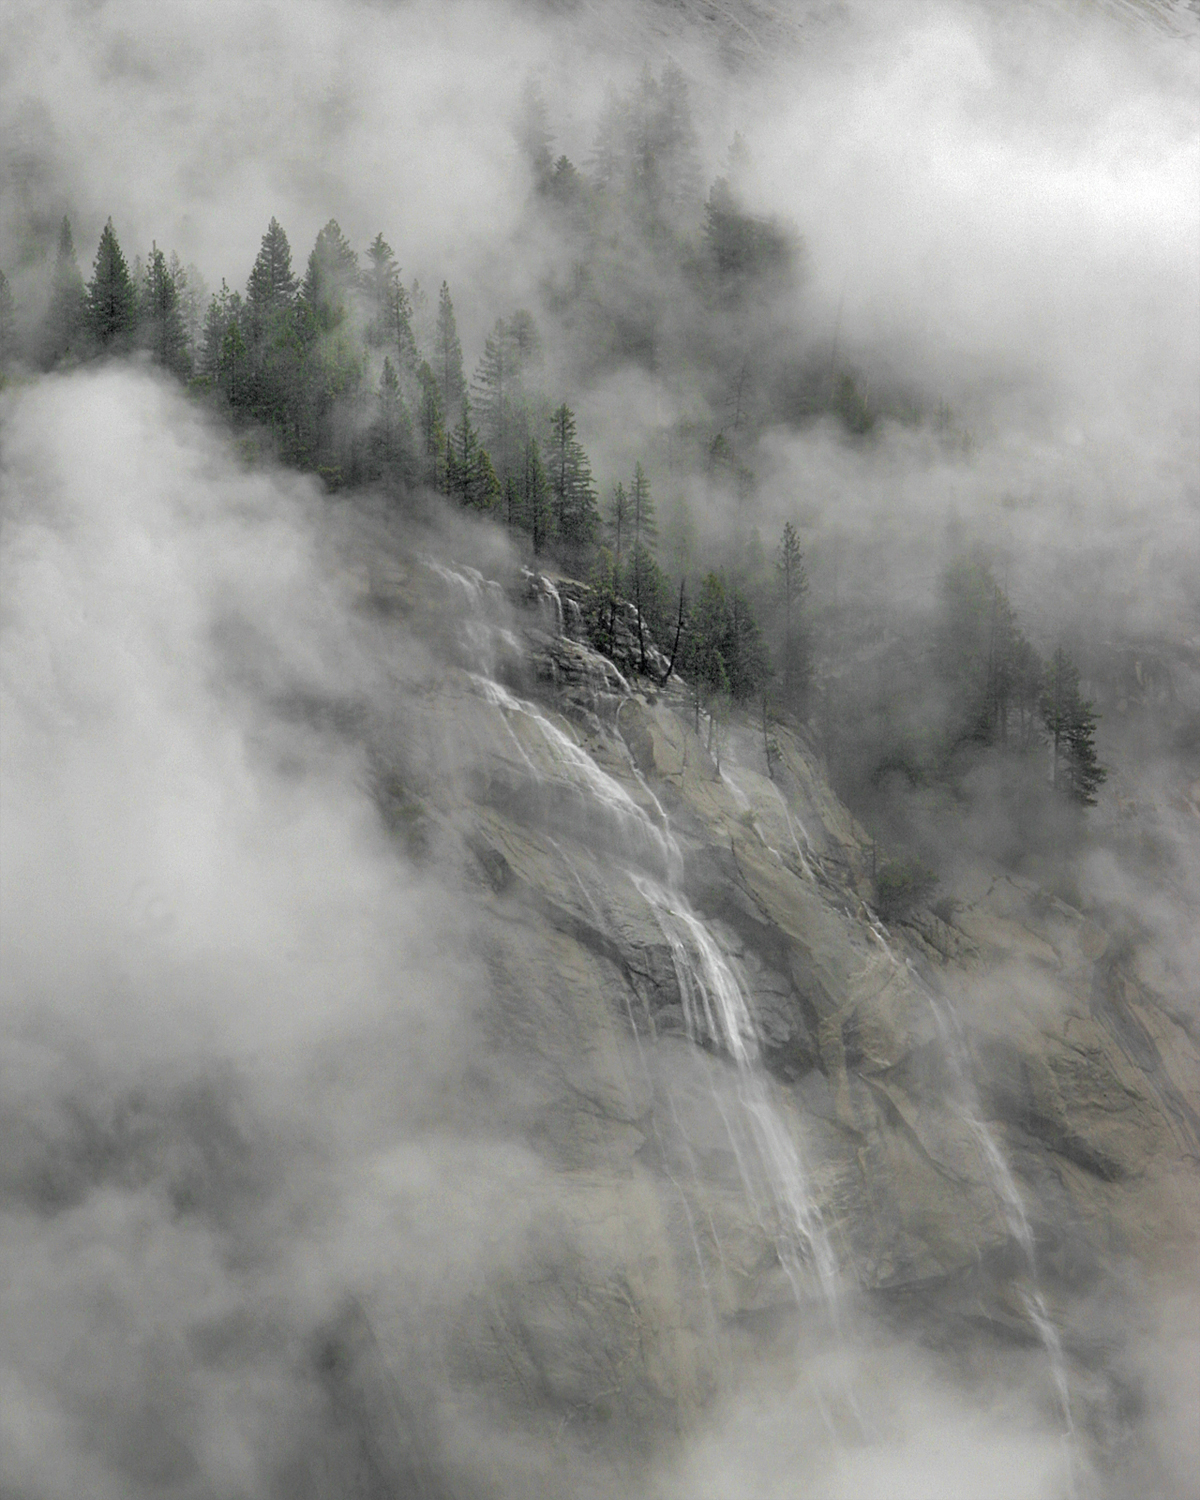
Photo © Rich Hansen
(click thumbnail above to see full-sized version)
Yosemite Mist, by Rich Hansen
1024x768 wallpaper version
1280x1024 wallpaper version
1600x1200 wallpaper version
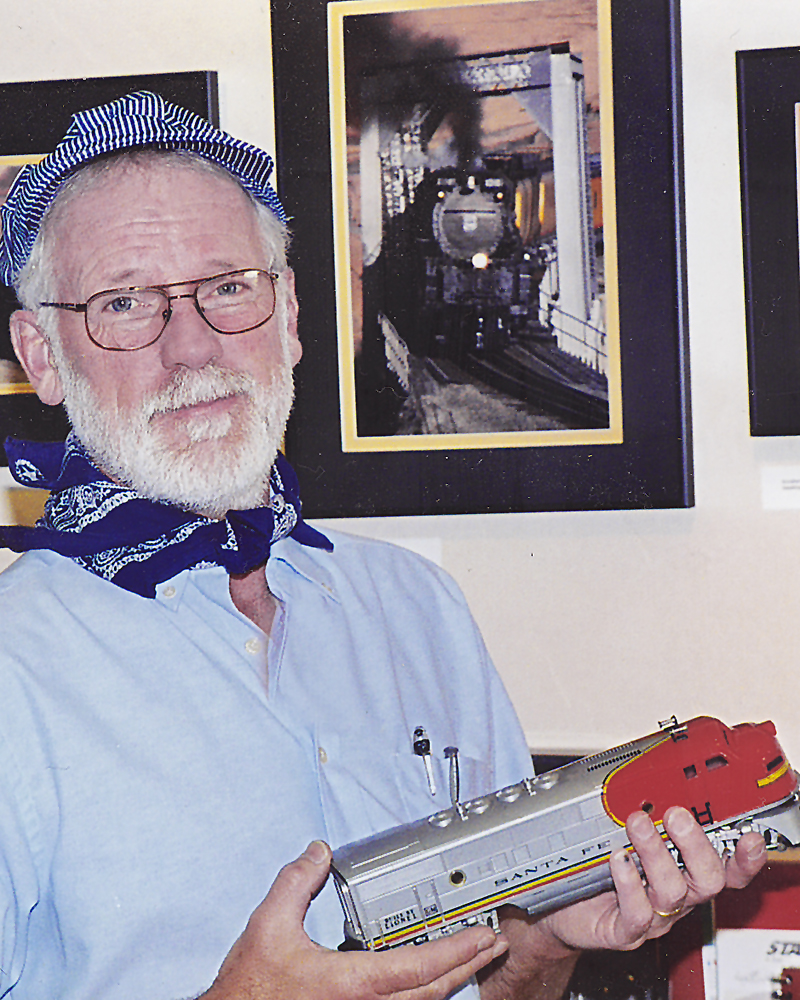 Rich Hansen,
another well-known local nature photographer, has exhibited his photos
in many events and functions at the
Morro Bay Museum of Natural
History and elsewhere nearby. He is a retired Food & Drug
microbiologist who started to
get serious about photography in 1976 when he bought his first Single
Lens Reflex
camera, a Canon FTBn. He has
been on the Central Coast since 1980,
where he met Joe Dickerson and George Lepp
and has been assisting and co-leading photography classes with
them for over 20 years. Rich's
bird and nature photography has graced the pages of many magazines
including:
Bird
Watcher's Digest,
Birder's World
Magazine,
National
Wildlife,
Ranger
Rick,
Smithsonian, and
Sunset.
Lately Rich has been indulging his passion for trains by
following and shooting rail activity in the ten
Western States. The
fact that Rich Hansen loves to talk about his photography while paddling
on Morro Bay with the
Santa Lucia
Chapter of the Sierra Club is one of the clear side benefits to
those of us
aspiring photographers who also kayak. Rich related the following
advice on our most recent outing: "I try to keep two things in mind
while I’m on a shoot. Keep it simple, and don’t put your camera
away just because the weather has turned a little foul. I have
lost count of how many times I have been to Yosemite. And, like
everyone else who has brought a camera with them, I have shot El
Capitan, the Falls and Half Dome time and time again. As result, I
have started looking for images that you might guess were taken in the
Park but do not scream 'Yosemite' like the previous icons do. On
this particular morning while shooting Yosemite Mist,
low clouds were just starting to break after raining most of the night.
So I took off for the nearest meadow with the idea of getting some macro
shots of rain drops on leaves, flowers, coyote whiskers, whatever.
The bad news was I had left my tripod in the room. Image
Stabilizer (IS) lenses are great and give you a distinct advantage over
non-IS, but there is still no substitute for that solid camera platform.
Speaking of equipment, I took this photo with my then non-IS 70-200mm
f2.8 attached to my Canon 20D at 1/60th of a second at f22. My
ISO
was set at 100. Here are a few considerations when shooting on
overcast days: First, never include the sky in your shot. If
your main subject is properly exposed, the sky will burn out and will
distract the viewer from your intended composition. Second, look
for a picture within the picture. Some of my favorite images of
Yosemite National Park are a small rapid in Dana Creek, a flowering
branch of Dogwood, and a single red Maple leaf. Okay, now you have
your images from your trip. There are a few more considerations
for optimizing your images back home on your computer. First, make
use of the saturation slider in the
Hue/Saturation adjustment layer by reducing the amount of magenta
and cyan in the file. There is almost always a lot of these two in
images shot on overcast days. This may not be noticeable on your
monitor but will certainly show up in a print if not corrected.
Second, do not over sharpen. The one major give away of a digital
image is over sharpening. All adjustments to an image should be
subtle -- noticeable, but subtle. I look forward to seeing you out
and about with your cameras. I can most readily be found on the
bay in my kayak or skulking along the nearest railroad tracks with my
radio scanner." You can contact Rich Hansen at richimages at tcsn dot net.
Rich Hansen,
another well-known local nature photographer, has exhibited his photos
in many events and functions at the
Morro Bay Museum of Natural
History and elsewhere nearby. He is a retired Food & Drug
microbiologist who started to
get serious about photography in 1976 when he bought his first Single
Lens Reflex
camera, a Canon FTBn. He has
been on the Central Coast since 1980,
where he met Joe Dickerson and George Lepp
and has been assisting and co-leading photography classes with
them for over 20 years. Rich's
bird and nature photography has graced the pages of many magazines
including:
Bird
Watcher's Digest,
Birder's World
Magazine,
National
Wildlife,
Ranger
Rick,
Smithsonian, and
Sunset.
Lately Rich has been indulging his passion for trains by
following and shooting rail activity in the ten
Western States. The
fact that Rich Hansen loves to talk about his photography while paddling
on Morro Bay with the
Santa Lucia
Chapter of the Sierra Club is one of the clear side benefits to
those of us
aspiring photographers who also kayak. Rich related the following
advice on our most recent outing: "I try to keep two things in mind
while I’m on a shoot. Keep it simple, and don’t put your camera
away just because the weather has turned a little foul. I have
lost count of how many times I have been to Yosemite. And, like
everyone else who has brought a camera with them, I have shot El
Capitan, the Falls and Half Dome time and time again. As result, I
have started looking for images that you might guess were taken in the
Park but do not scream 'Yosemite' like the previous icons do. On
this particular morning while shooting Yosemite Mist,
low clouds were just starting to break after raining most of the night.
So I took off for the nearest meadow with the idea of getting some macro
shots of rain drops on leaves, flowers, coyote whiskers, whatever.
The bad news was I had left my tripod in the room. Image
Stabilizer (IS) lenses are great and give you a distinct advantage over
non-IS, but there is still no substitute for that solid camera platform.
Speaking of equipment, I took this photo with my then non-IS 70-200mm
f2.8 attached to my Canon 20D at 1/60th of a second at f22. My
ISO
was set at 100. Here are a few considerations when shooting on
overcast days: First, never include the sky in your shot. If
your main subject is properly exposed, the sky will burn out and will
distract the viewer from your intended composition. Second, look
for a picture within the picture. Some of my favorite images of
Yosemite National Park are a small rapid in Dana Creek, a flowering
branch of Dogwood, and a single red Maple leaf. Okay, now you have
your images from your trip. There are a few more considerations
for optimizing your images back home on your computer. First, make
use of the saturation slider in the
Hue/Saturation adjustment layer by reducing the amount of magenta
and cyan in the file. There is almost always a lot of these two in
images shot on overcast days. This may not be noticeable on your
monitor but will certainly show up in a print if not corrected.
Second, do not over sharpen. The one major give away of a digital
image is over sharpening. All adjustments to an image should be
subtle -- noticeable, but subtle. I look forward to seeing you out
and about with your cameras. I can most readily be found on the
bay in my kayak or skulking along the nearest railroad tracks with my
radio scanner." You can contact Rich Hansen at richimages at tcsn dot net.
Photo © Marlin Harms
(click thumbnail above to see full-sized version)
Windy Cove, by Marlin Harms
1024x768 wallpaper version
1280x1024 wallpaper version
1600x1100 wallpaper version
 Marlin Harms is
a part-time birder, flower-lover, and photographer who, for years, has
tried to cram as much natural history photography as possible into
available time. You can't be serious about nature in Morro Bay
without having run across Marlin more than once! He has exhibited photos in a number of local shows and has
had a few images published. Marlin explains how he created one his
favorite photos,
entitled
Windy Cove. "My methods and the resulting photo can show a few
pointers for budding photographers. I had seen a similar photo --
inspiration takes many forms -- and had planned to shoot this
during a foggy day. Patterns (the descending row of trees, in
this case) are particularly appealing to us visually. This was back in
the days of film and I used a contrasty film (Velvia) to bring out the
pattern as it fades into the consuming fog. This is a very familiar
site to many of us (just north of the Morro Bay Museum of Natural
History), but many people do not recognize it. One has to find ways to
meet the challenge of making a fresh and appealing image of a familiar
site or subject -- I chose a lower-than-eye-level point of reference
and used a zoom lens, varying its field to try to crop out
anything not essential to this photo. That may sound strange, but
less (complicated) is better. I used a tripod, a very valuable
piece of equipment when using significant depth of field which, in this
low light situation, meant a long exposure. Don’t be fooled by
using a high ISO on your digital camera -- unless you will be content
with a very small photo -- because a high ISO will generate a lot of
'noise' (but
see also in this article that Garry Johnson has a comment on using high
ISOs). Probably many viewers do not realize there is an endangered
species in this photo -- the green plant in the foreground is Sueda
californica, which grows in very few places other than the Morro Bay
estuary. Though not the sole focus of my photography, I am always glad
when I can point out a conservation need, i.e., when my photography can
be useful as well as ornamental. A certain amount of
luck never hurts -- the ethereal feel as the fog fades out in the
distance is greater than I had planned." You can contact Marlin
Harms at MCTHarms at aol dot com.
Marlin Harms is
a part-time birder, flower-lover, and photographer who, for years, has
tried to cram as much natural history photography as possible into
available time. You can't be serious about nature in Morro Bay
without having run across Marlin more than once! He has exhibited photos in a number of local shows and has
had a few images published. Marlin explains how he created one his
favorite photos,
entitled
Windy Cove. "My methods and the resulting photo can show a few
pointers for budding photographers. I had seen a similar photo --
inspiration takes many forms -- and had planned to shoot this
during a foggy day. Patterns (the descending row of trees, in
this case) are particularly appealing to us visually. This was back in
the days of film and I used a contrasty film (Velvia) to bring out the
pattern as it fades into the consuming fog. This is a very familiar
site to many of us (just north of the Morro Bay Museum of Natural
History), but many people do not recognize it. One has to find ways to
meet the challenge of making a fresh and appealing image of a familiar
site or subject -- I chose a lower-than-eye-level point of reference
and used a zoom lens, varying its field to try to crop out
anything not essential to this photo. That may sound strange, but
less (complicated) is better. I used a tripod, a very valuable
piece of equipment when using significant depth of field which, in this
low light situation, meant a long exposure. Don’t be fooled by
using a high ISO on your digital camera -- unless you will be content
with a very small photo -- because a high ISO will generate a lot of
'noise' (but
see also in this article that Garry Johnson has a comment on using high
ISOs). Probably many viewers do not realize there is an endangered
species in this photo -- the green plant in the foreground is Sueda
californica, which grows in very few places other than the Morro Bay
estuary. Though not the sole focus of my photography, I am always glad
when I can point out a conservation need, i.e., when my photography can
be useful as well as ornamental. A certain amount of
luck never hurts -- the ethereal feel as the fog fades out in the
distance is greater than I had planned." You can contact Marlin
Harms at MCTHarms at aol dot com.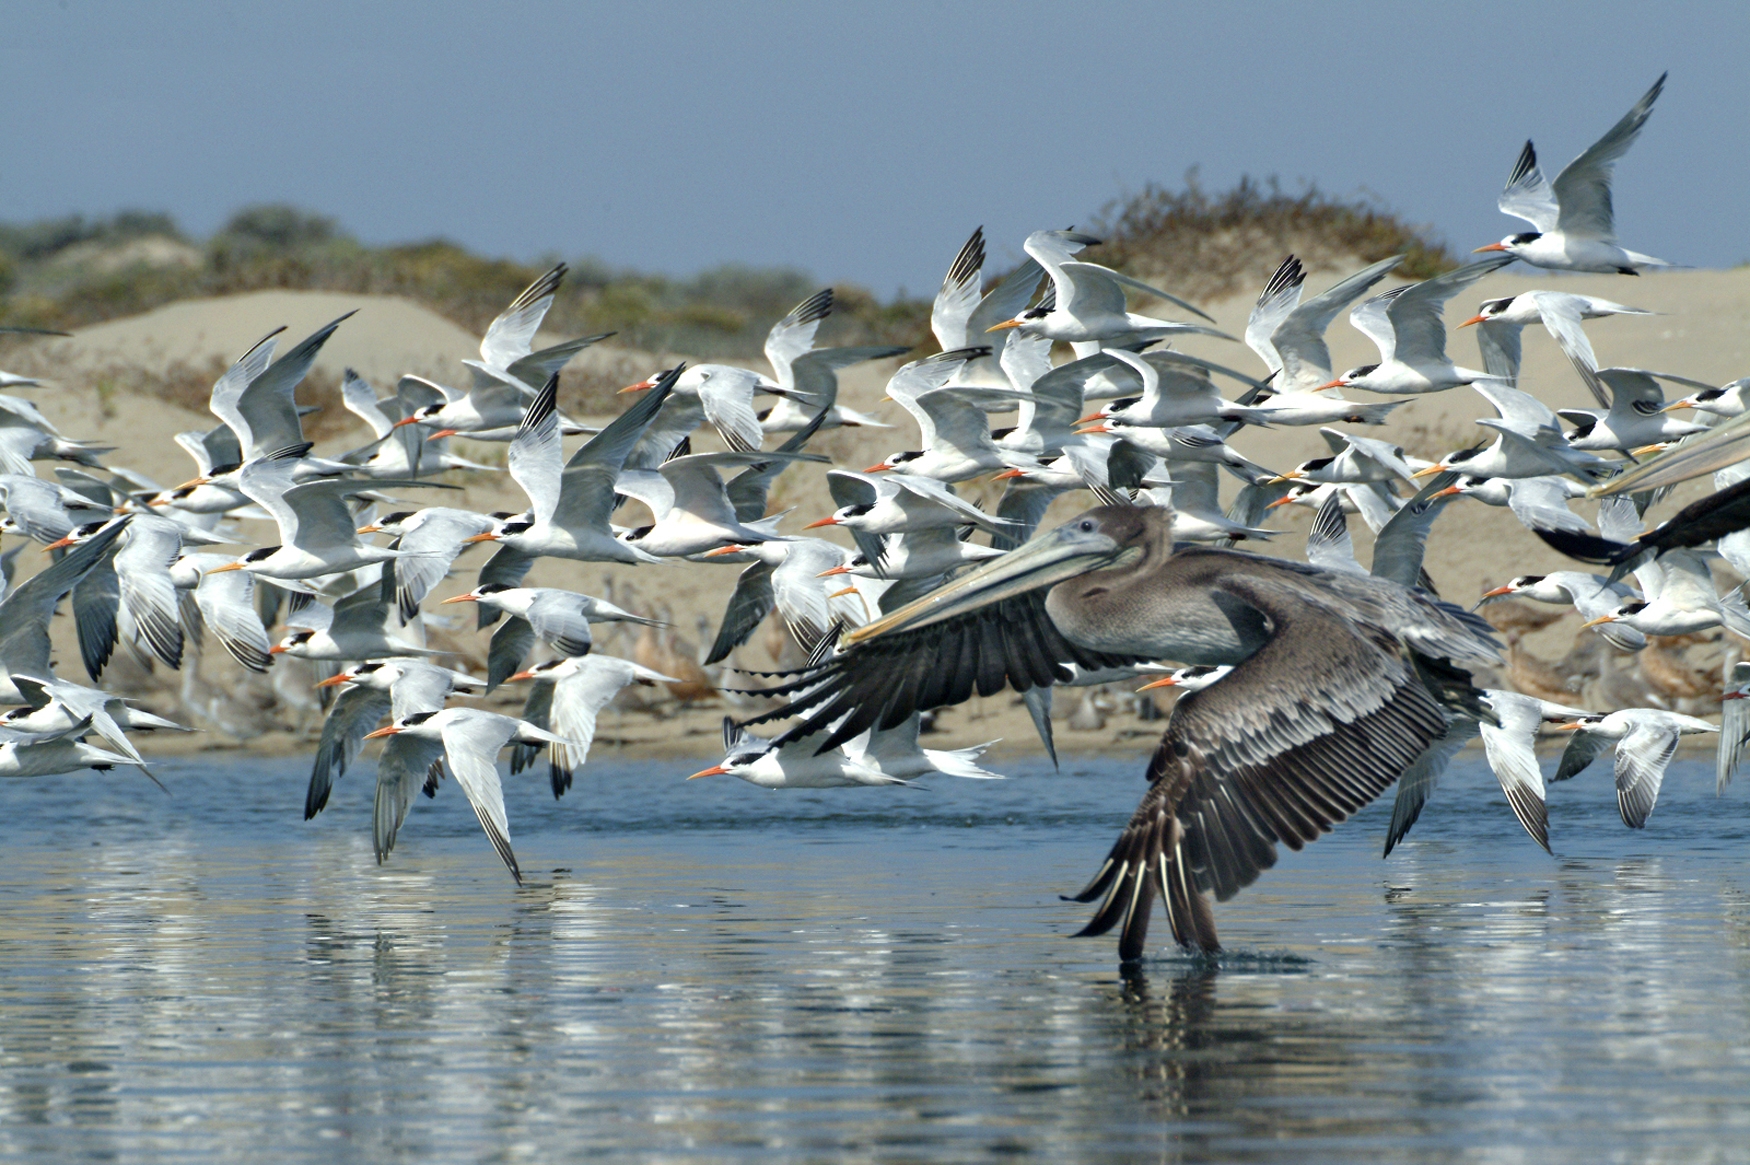
Photo © Garry Johnson
(click thumbnail above to see full-sized version)
Brown Pelican with Terns, by Garry Johnson
1024x768 wallpaper version
1280x1024 wallpaper version
1600x1200 wallpaper version
3000x1997 full-res version for use only by the CCNHA print editor
 Garry Johnson
became interested in
photography as a student at
Compton College,
where he won the
Jean Landon Taylor award for outstanding photography. He went
on to study photography at
Art Center, LA,
and earned an engineering degree at
Cal Poly.
His creative work over the last 50 years has earned him many awards in
various fields of photography. He is now retired from Lockheed,
Sunnyvale, CA, and lives in Morro Bay pursuing his true love, using
digital photography to capture the beauty of nature along the Central
Coast of California. Garry teaches a very popular digital
photography course, which many of us have taken, for
Cal Poly OSHER
and
Friends of San Luis Obispo Botanical Garden.
Garry says that "The Morro Bay Estuary is one of my favorite places to
take pictures, from a kayak, of birds in action. I use a Fuji S2 pro
camera with a
Sigma 500mm (720mm) lens. The best time to take bird pictures
on the estuary is from early morning until noon while sun light is
coming from the east, and around high tide is best. Without using a
tripod to capture a sharp focus of a fast moving bird, I will generally
set a higher ISO speed of around 800 to 1600 in order to get the shutter speed around
1/2000th to
1/3000th of a second. Anything less then that, the pictures may not
be sharp. The Fuji camera has the
CCD sensor that does not have as much 'noise' at the higher ISO
settings as a
CMOS
sensor, which is evident here in my photo entitled Brown Pelican with Terns.
Because the birds in flight are moving so fast and you have to react
instantly to get that rare bird picture, there isn’t time to use manual
focus and the mode setting is generally set on 'S' to be able to adjust
the speed quickly.
I recently published a book on 'Morro Bay Sunsets' and I am working on
another book entitled 'Birds on the Morro Bay estuary.'”
You can contact Garry Johnson at garryjohnson at charter dot net.
Garry Johnson
became interested in
photography as a student at
Compton College,
where he won the
Jean Landon Taylor award for outstanding photography. He went
on to study photography at
Art Center, LA,
and earned an engineering degree at
Cal Poly.
His creative work over the last 50 years has earned him many awards in
various fields of photography. He is now retired from Lockheed,
Sunnyvale, CA, and lives in Morro Bay pursuing his true love, using
digital photography to capture the beauty of nature along the Central
Coast of California. Garry teaches a very popular digital
photography course, which many of us have taken, for
Cal Poly OSHER
and
Friends of San Luis Obispo Botanical Garden.
Garry says that "The Morro Bay Estuary is one of my favorite places to
take pictures, from a kayak, of birds in action. I use a Fuji S2 pro
camera with a
Sigma 500mm (720mm) lens. The best time to take bird pictures
on the estuary is from early morning until noon while sun light is
coming from the east, and around high tide is best. Without using a
tripod to capture a sharp focus of a fast moving bird, I will generally
set a higher ISO speed of around 800 to 1600 in order to get the shutter speed around
1/2000th to
1/3000th of a second. Anything less then that, the pictures may not
be sharp. The Fuji camera has the
CCD sensor that does not have as much 'noise' at the higher ISO
settings as a
CMOS
sensor, which is evident here in my photo entitled Brown Pelican with Terns.
Because the birds in flight are moving so fast and you have to react
instantly to get that rare bird picture, there isn’t time to use manual
focus and the mode setting is generally set on 'S' to be able to adjust
the speed quickly.
I recently published a book on 'Morro Bay Sunsets' and I am working on
another book entitled 'Birds on the Morro Bay estuary.'”
You can contact Garry Johnson at garryjohnson at charter dot net.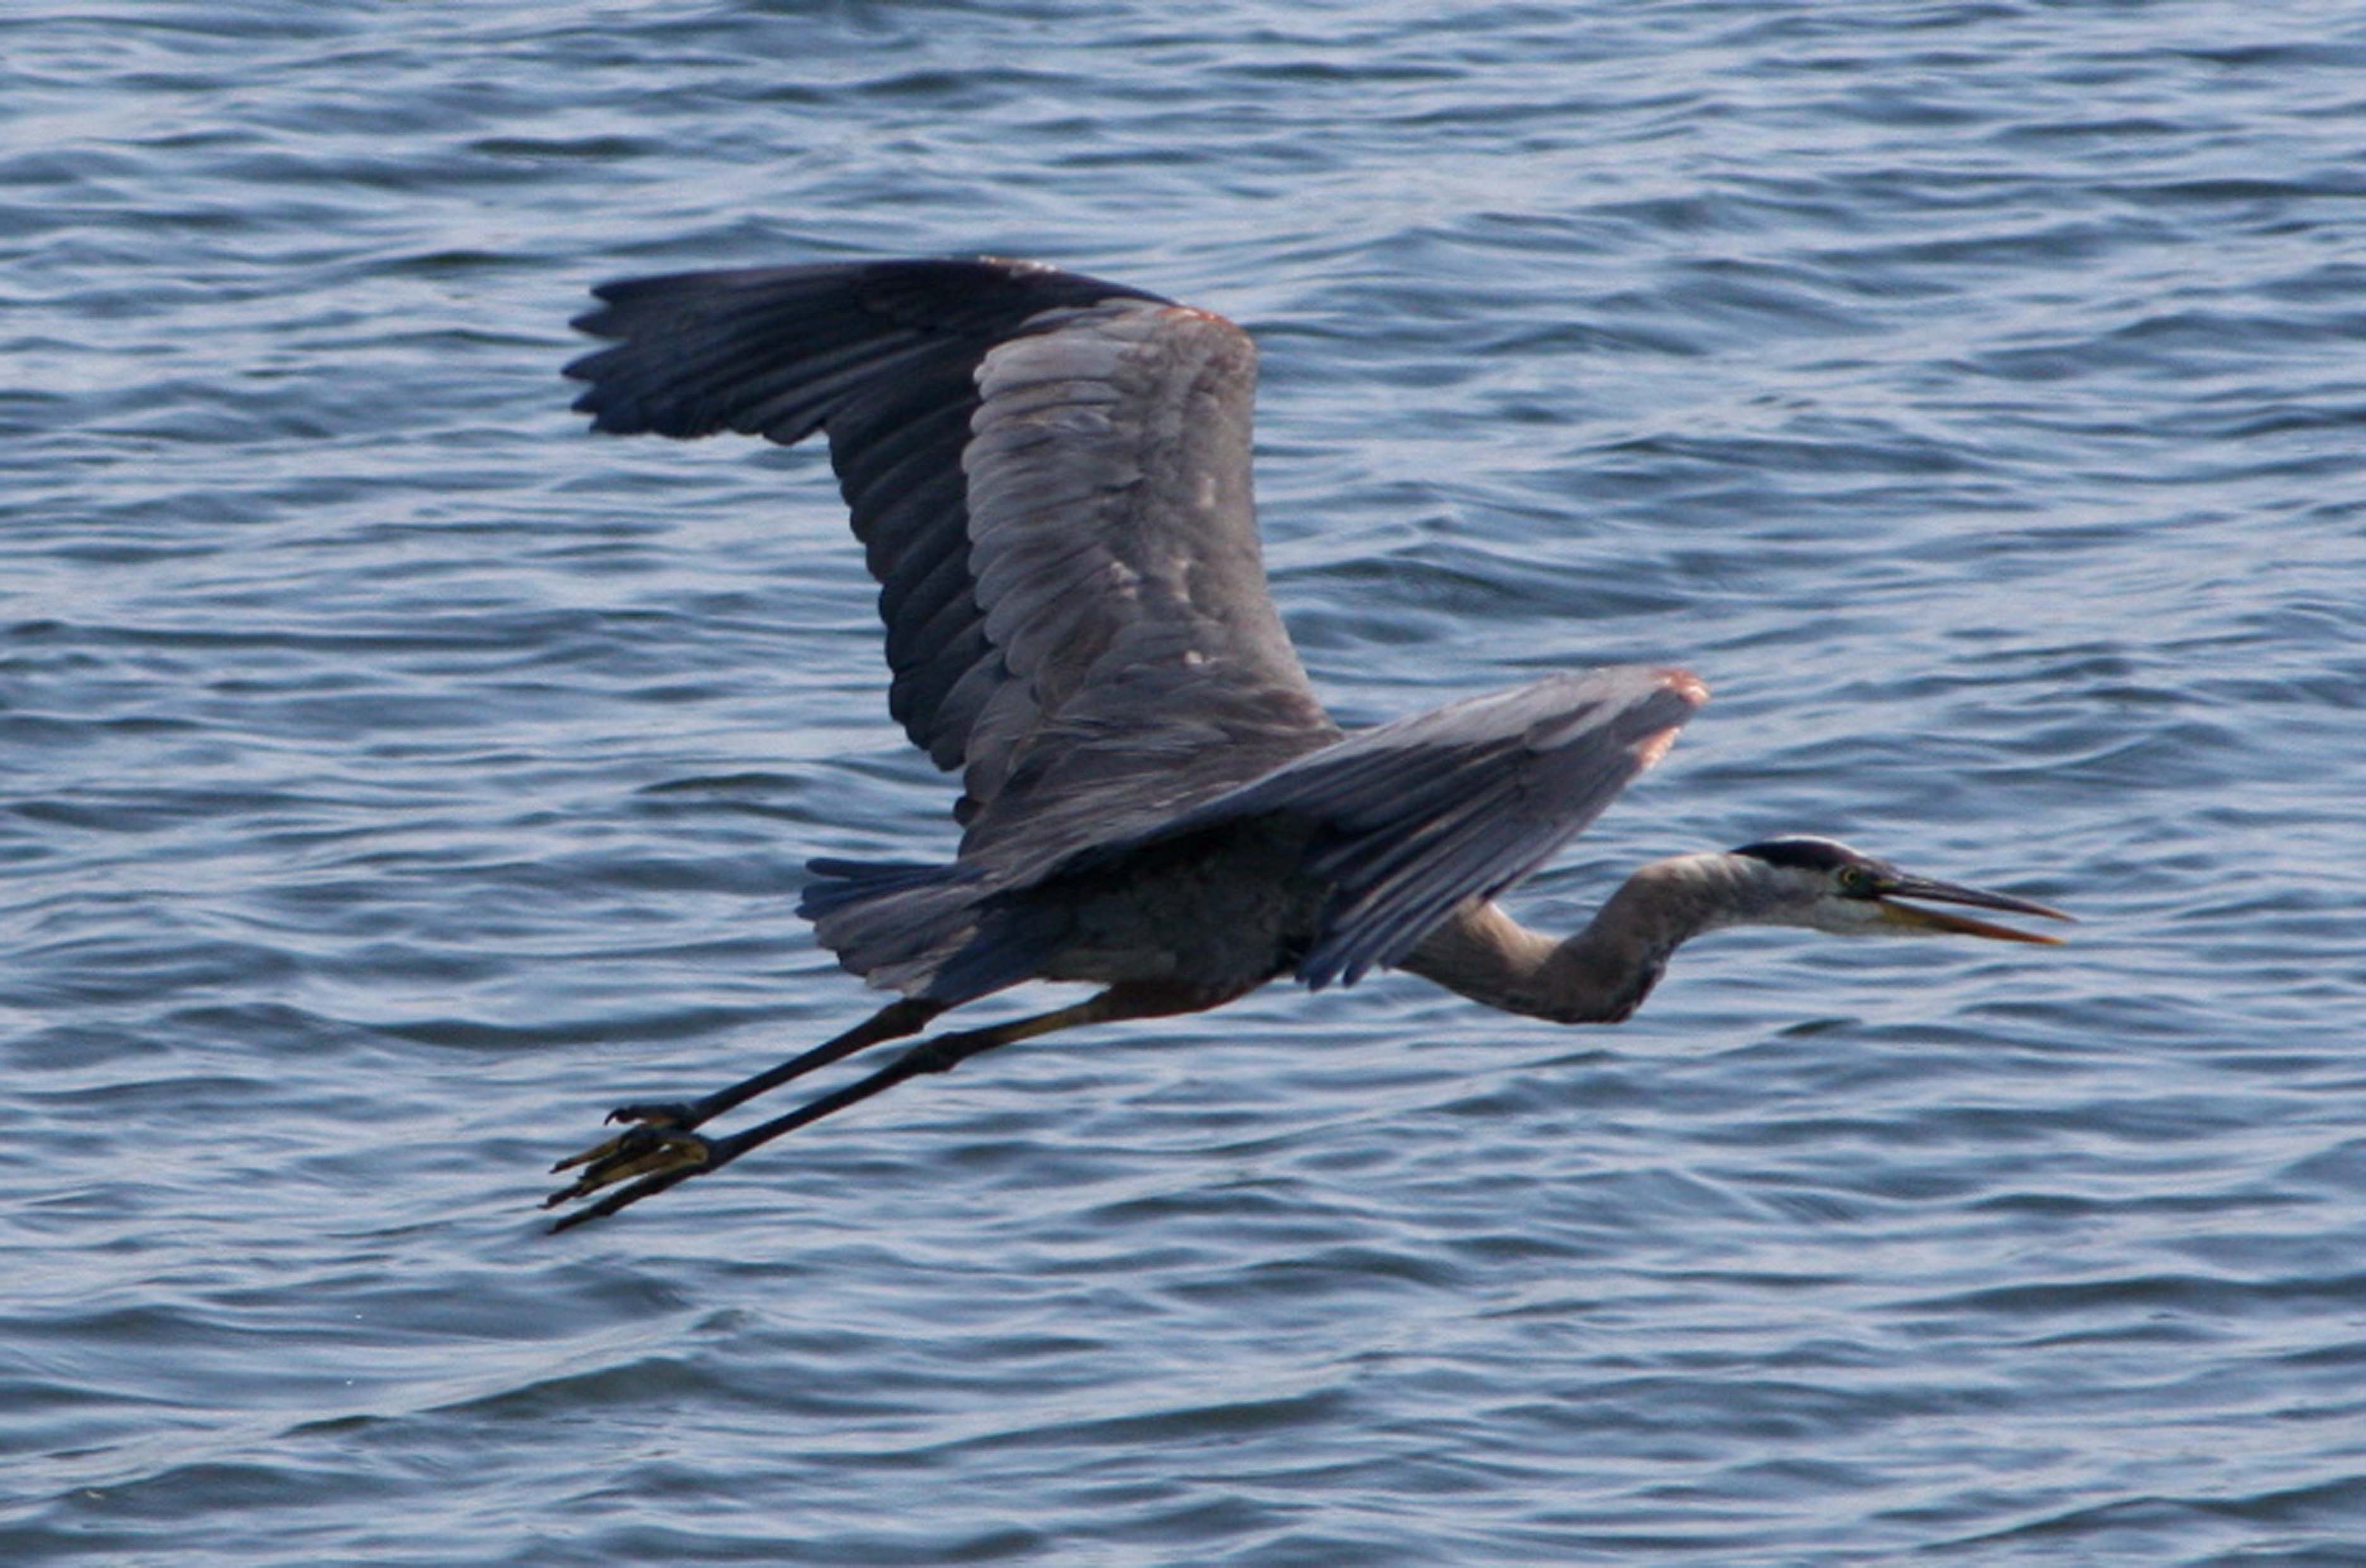
Photo © Teddy Llovet
(click thumbnail above to see full-sized version)
Great Blue Heron, by Teddy Llovet
1024x768 wallpaper version
1280x1024 wallpaper version
1600x1200 wallpaper version
 Teddy Llovet
found a passion for nature photography while recovering from a
disability five years ago. Eager to share the views through her lens,
Teddy began showing in local galleries, the
Morro Bay Museum of Natural
History, and in her own show in 2003 honoring the birds and beauty of our
local area. Teddy exclaims, "I'm so lucky
to live here! After completing beginning and intermediate
photography at Cuesta College
in the fall of 2000, I was ready to purchase my Canon Rebel 35mm SLR
film camera with a wide angle lens. My love of birds prompted me
to invest in Canon’s 75-300 image
stabilizer (IS) telephoto lens for action shots. I wanted to move
freely without bulk of equipment and be ready for the flight. The IS
lens gives me that handheld capability. I eventually acquired a
tripod and shutter release cable, but my IS telephoto is my ready
companion. In March 2005, I took the leap of faith into digital
photography with Canon’s Digital Rebel, bringing my IS telephoto lens
along with it. Now it’s just more fun than ever and I use my
sports mode freely. My iMac computer with Adobe Photoshop 7.0
extends my enjoyment with the creation of brochures and cards for
friends. I have never digitally altered a picture that I offered
for sale. I appreciate the natural setting around these beautiful
birds. In the future, I may erase a twig that bothers the eye but,
mostly, I want to continue to bring forth what nature sets before me.
My gifts have been an eye for composition and the patience to spend
hours in the field. I once waited on bended knee for 20 minutes to
photograph an approaching fishing Great Egret. My daughter chose
that image for her Christmas Peace card in 2001. When I have more
available time, I’ll take a digital photography and Photoshop course and
study the techniques I need to understand more about. For now, I
treasure the time I can just be out there waiting for another special
moment and there are many. Here is one of my special moments,
taken near Morro Rock in 2005 of my favorite bird, entitled Great Blue Heron." You can contact Teddy Llovet at bluheron at
earthlink dot net.
Teddy Llovet
found a passion for nature photography while recovering from a
disability five years ago. Eager to share the views through her lens,
Teddy began showing in local galleries, the
Morro Bay Museum of Natural
History, and in her own show in 2003 honoring the birds and beauty of our
local area. Teddy exclaims, "I'm so lucky
to live here! After completing beginning and intermediate
photography at Cuesta College
in the fall of 2000, I was ready to purchase my Canon Rebel 35mm SLR
film camera with a wide angle lens. My love of birds prompted me
to invest in Canon’s 75-300 image
stabilizer (IS) telephoto lens for action shots. I wanted to move
freely without bulk of equipment and be ready for the flight. The IS
lens gives me that handheld capability. I eventually acquired a
tripod and shutter release cable, but my IS telephoto is my ready
companion. In March 2005, I took the leap of faith into digital
photography with Canon’s Digital Rebel, bringing my IS telephoto lens
along with it. Now it’s just more fun than ever and I use my
sports mode freely. My iMac computer with Adobe Photoshop 7.0
extends my enjoyment with the creation of brochures and cards for
friends. I have never digitally altered a picture that I offered
for sale. I appreciate the natural setting around these beautiful
birds. In the future, I may erase a twig that bothers the eye but,
mostly, I want to continue to bring forth what nature sets before me.
My gifts have been an eye for composition and the patience to spend
hours in the field. I once waited on bended knee for 20 minutes to
photograph an approaching fishing Great Egret. My daughter chose
that image for her Christmas Peace card in 2001. When I have more
available time, I’ll take a digital photography and Photoshop course and
study the techniques I need to understand more about. For now, I
treasure the time I can just be out there waiting for another special
moment and there are many. Here is one of my special moments,
taken near Morro Rock in 2005 of my favorite bird, entitled Great Blue Heron." You can contact Teddy Llovet at bluheron at
earthlink dot net.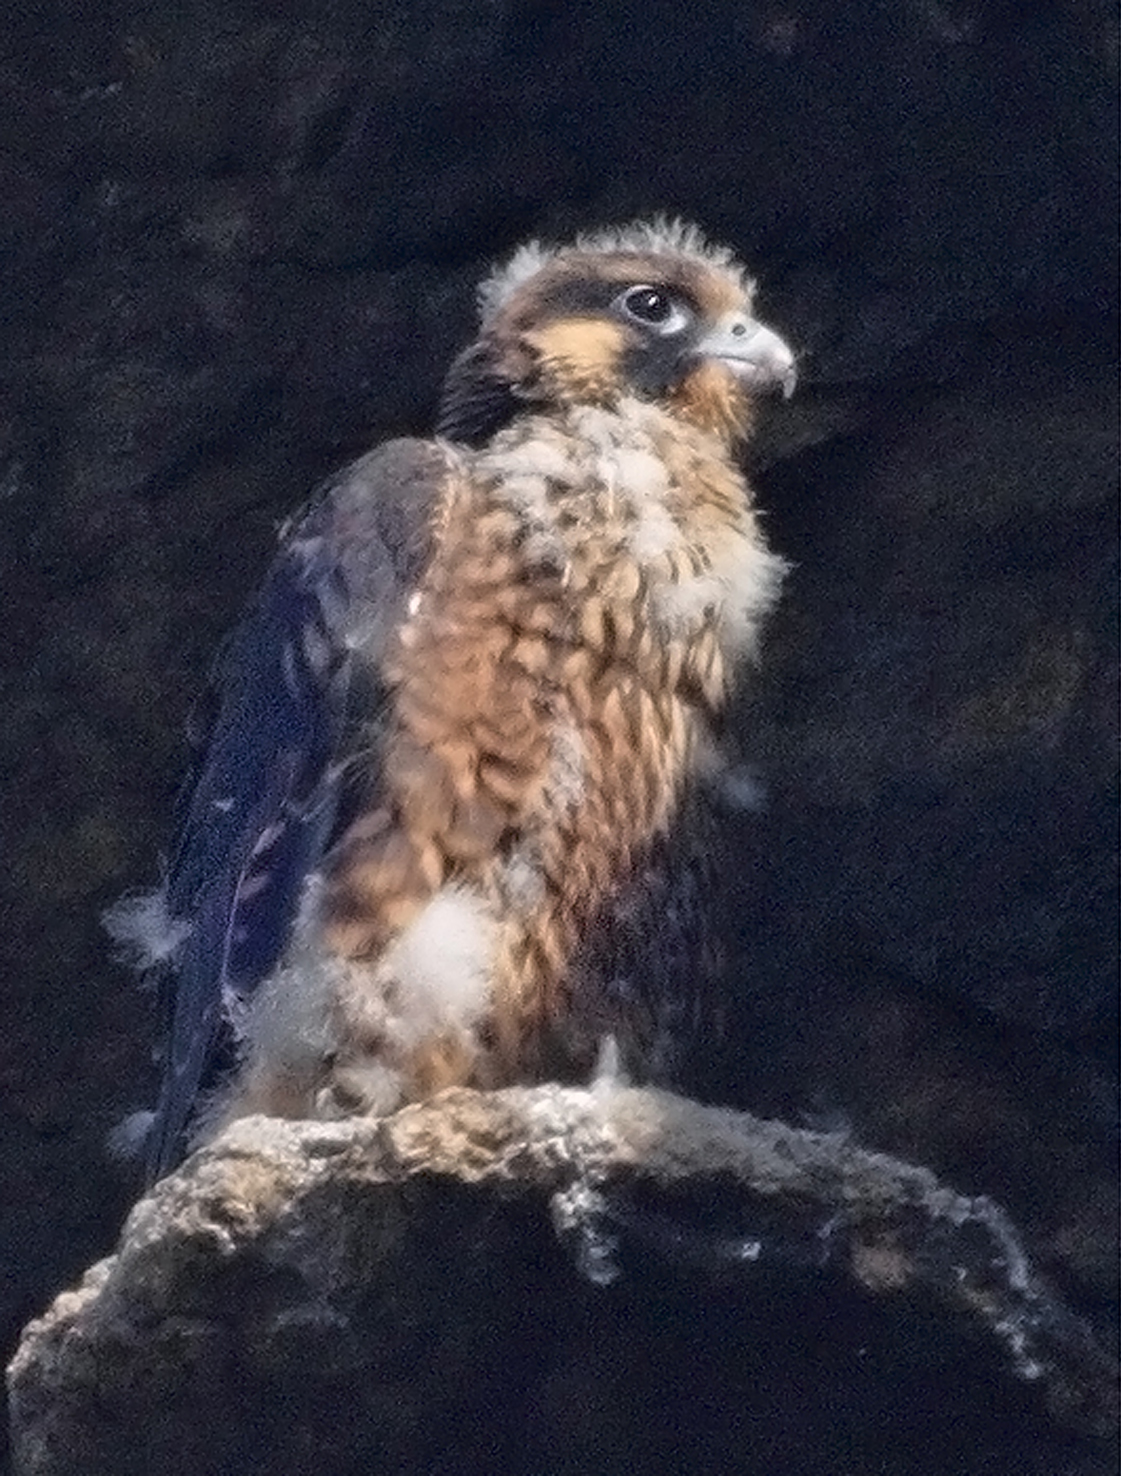
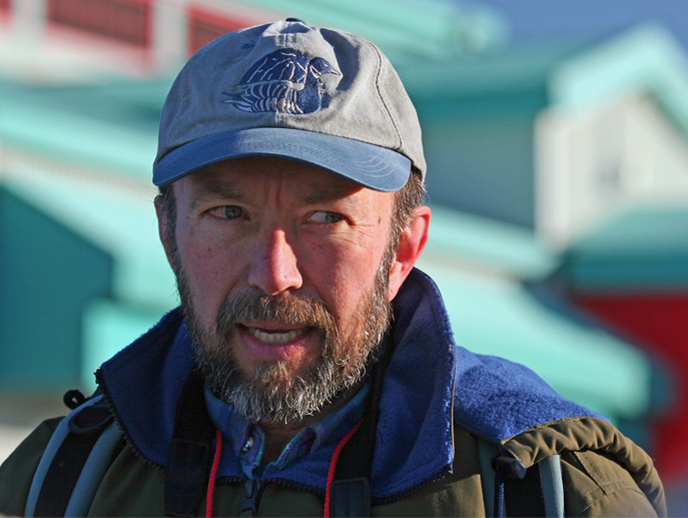
Photo © Cleve Nash
(click thumbnail above to see full-sized version)
Peregrine Falcon Chick, Morro Rock, 2006, by Cleve Nash
1024x768 wallpaper version
For CCNHA print publication uncropped 1476x1121 original .tif and enhanced .tif
 Cleve Nash
can often be encountered at Morro Rock photographing the peregrine
falcons and sea otters. Cleve shares his photos generously online
at his
clevenash.com
website, and they are quite well known,
especially amongst the
Morro Rock
Peregrine Falcon crowd at
morrorockperegrines.com.
I asked Cleve what kind of camera equipment and skills one needs to take
such good photos of subjects hundreds of feet away -- something I call
extreme-distance photography. Cleve said, "In my humble opinion, one can't take really
good pictures of individual creatures from hundreds of feet away, at
least not at sea level in moist, moving air. The more such air there is
between camera and subject, the more focus softening and distortion will
occur. Also, distance magnifies camera shake. At extreme focal
lengths, even minute vibrations blur the image. However, one can get
acceptable results." When asked whether one can use a telescope to
take pictures, Cleve replied, "Absolutely. I've seen surprisingly
decent photos produced by sticking a point-and-shoot up to the eyepiece
of a spotting scope. But I think best results are obtained by
using a good telescope in prime focus with an SLR. Aperture is
fixed, and shutter speed must be set. At distances exceeding 100
feet, lighting can't be controlled, even with a
Better Beamer Flash Extender. But usually the biggest
challenge is manual focusing. A large, bright viewfinder helps,
and there are devices such as viewfinder magnifiers and digital
techniques and equipment for enlarging images to adjust focus for the
next shot. A good tripod, remote shutter release, and mirror
lockup will help to minimize camera shake. Then again, as
mentioned above, there are the atmospherics that wreak havoc with focus.
Cool, calm mornings are best. My photo entitled Peregrine Falcon
Chick demonstrates the limits of quality when shooting
through 2120 mm of glass at f/20, 1/200 sec. ISO 400 from 170 yards
away. There is no substitute for getting close. But when, as
in this case, you can't get closer, you learn to accept image softness
and just appreciate a closer look at the bird. I plan to continue to work in social services quality assurance until
December, 2007, when I will retire to photography, videography, riding
bicycles, and many other ways to avoid honey-do jobs." You can contact
Cleve Nash at cleve.nash at gmail dot com.
Cleve Nash
can often be encountered at Morro Rock photographing the peregrine
falcons and sea otters. Cleve shares his photos generously online
at his
clevenash.com
website, and they are quite well known,
especially amongst the
Morro Rock
Peregrine Falcon crowd at
morrorockperegrines.com.
I asked Cleve what kind of camera equipment and skills one needs to take
such good photos of subjects hundreds of feet away -- something I call
extreme-distance photography. Cleve said, "In my humble opinion, one can't take really
good pictures of individual creatures from hundreds of feet away, at
least not at sea level in moist, moving air. The more such air there is
between camera and subject, the more focus softening and distortion will
occur. Also, distance magnifies camera shake. At extreme focal
lengths, even minute vibrations blur the image. However, one can get
acceptable results." When asked whether one can use a telescope to
take pictures, Cleve replied, "Absolutely. I've seen surprisingly
decent photos produced by sticking a point-and-shoot up to the eyepiece
of a spotting scope. But I think best results are obtained by
using a good telescope in prime focus with an SLR. Aperture is
fixed, and shutter speed must be set. At distances exceeding 100
feet, lighting can't be controlled, even with a
Better Beamer Flash Extender. But usually the biggest
challenge is manual focusing. A large, bright viewfinder helps,
and there are devices such as viewfinder magnifiers and digital
techniques and equipment for enlarging images to adjust focus for the
next shot. A good tripod, remote shutter release, and mirror
lockup will help to minimize camera shake. Then again, as
mentioned above, there are the atmospherics that wreak havoc with focus.
Cool, calm mornings are best. My photo entitled Peregrine Falcon
Chick demonstrates the limits of quality when shooting
through 2120 mm of glass at f/20, 1/200 sec. ISO 400 from 170 yards
away. There is no substitute for getting close. But when, as
in this case, you can't get closer, you learn to accept image softness
and just appreciate a closer look at the bird. I plan to continue to work in social services quality assurance until
December, 2007, when I will retire to photography, videography, riding
bicycles, and many other ways to avoid honey-do jobs." You can contact
Cleve Nash at cleve.nash at gmail dot com.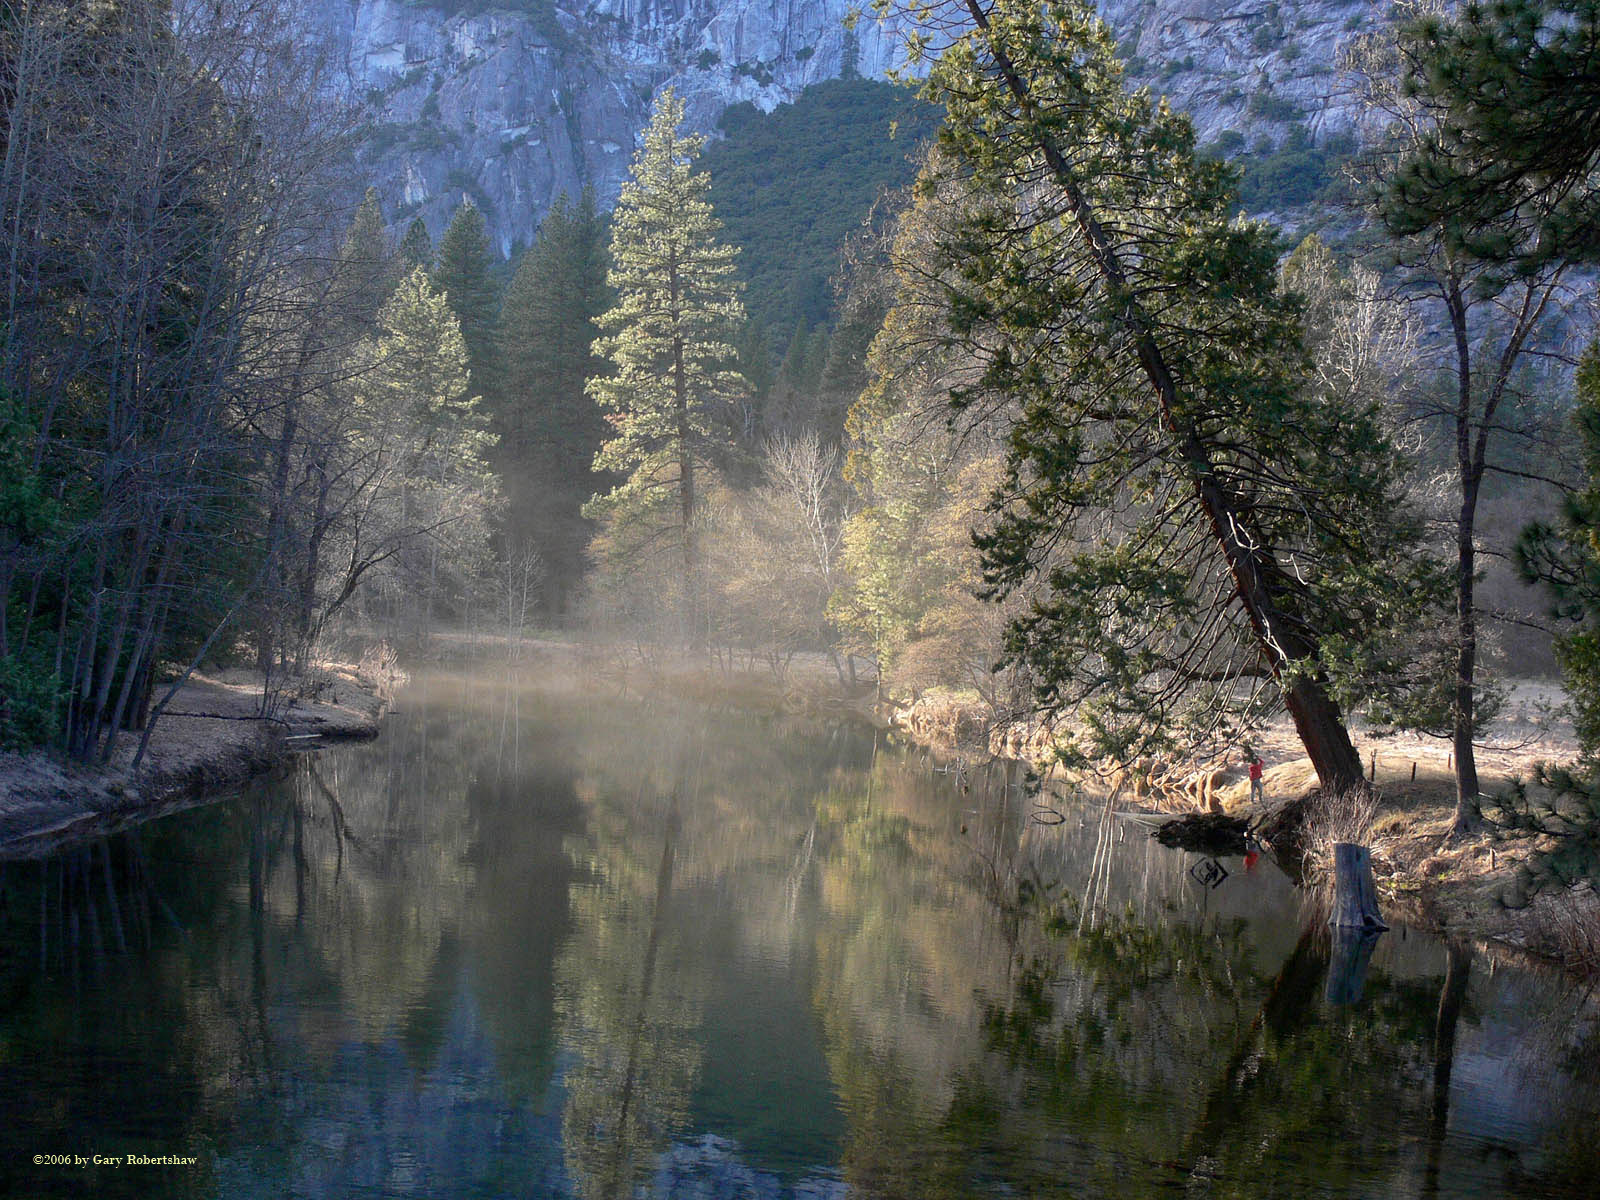
Photo © Gary Robertshaw
(click thumbnail above to see full-sized version)
Merced River, by Gary Robertshaw
1024x768 wallpaper version
1280x960 wallpaper version
1600x1200 wallpaper version
800x600 wallpaper version
 Gary Robertshaw
has been a photographer most of
his life. It is always a treat to run into Gary at Morro Rock. Gary
publishes and, in the spirit of community, generously shares most of his
magnificent photos at
pbase.com/roberthouse. Gary's photo entitled Merced
River is a product of many years of experience, as he
explains... "At age 10, I remember wandering around San Francisco with my Brownie camera. I remained active in photography through high school. Later, the lack of a darkroom kept me from getting too involved
in photography. But in the mid-1990's, consumer-priced scanners,
photo printers, and the availability of Adobe Photoshop renewed
my interest. Finally, I could do 'darkroom' work without
having a darkroom, and get closer to what I wanted from the photos. Not long after that, digital cameras began to improve, and as
soon as I found one I could afford that gave a decent printed
result, my film cameras found the shelf and never left. The Central Coast is really a photographer's paradise. Opportunities
for nature photography abound as we are surrounded by beautiful scenic
areas and wildlife. Capturing that real-life beauty in a two-dimensional
photo can be a challenge, but there are a few fairly simple things
that can make a big difference in your photos. Get up early; stay out late. Dusk and dawn lighting,
as well as the angle of the sun in the earlier part of the morning
and later part of the afternoon, can make the difference between
a technically-nice, but 'blah' photo and a photo with
dramatic impact. I've been out in Yosemite Valley in mid-summer-full-blown
tourist season, at daybreak, and been the only human I could see
or hear in any direction. Get out of the car. It's easy to want to grab your camera,
hop out of the car, assess the scene, and decide whether there's
anything to photograph or not. You'll never find out if you do
it that way. Grab a jacket, lock the door, and walk. You'll be
amazed what you find that you didn't notice from that 'convenient'
location next to your car. Take your time. Every animal hides
when they see you coming. Walk slowly, and take in your environment... you're
probably walking right by a great photo. When you find a nice
spot, sit down. Be quiet. Watch. When things become 'normal'
the wildlife goes back to their normal behavior, but it may take
a while, so be patient. Nothing is less conducive to getting good
photos than a photographer in a hurry. Learn to use the camera's basic
settings. Even the simplest digitals usually have exposure
value, or 'EV' settings. Learn to use them; they can make a huge difference, especially
when you're out in that morning or afternoon light. By all means, if you know how to use f/stops and shutter speeds
to your advantage, do it; but if not, or if you don't have time,
the EV settings are a good quick way of adjusting the camera's
exposure to your liking. Shooting in more dramatic lighting is
more difficult, but the camera doesn't know this; those settings
are the way to tell the camera what you want. Give yourself some
'photo time.' Give your
family or friends a break; if you're out with them, don't expect
them to stop at every photo-op you see. Sure, take your camera,
and use it, but make your priority enjoying your time with the
folks you're with. Then, when they go off to watch TV,
etc., grab your camera and head on out. Now you can go as slowly
as you want, where you want, and give priority to getting some
good photos. Use photo editing software. It is very seldom
that a camera will produce a photo that can't be improved with just some
basic adjustments in, for example,
Adobe Photoshop Elements. These editors contain
'quick fix' solutions as well
as more advanced adjustments like levels and sharpening, so you
can start with quick fixes, and if you like the results, maybe
learn a little more as you go. Crop out the unnecessary parts
of the photo; level the horizon or vertical subject, it makes
a big difference. It will be worth it. Don't blame the camera.
The simplest camera can produce excellent photos in the 'right' hands.
'Right,' in this case, doesn't necessarily mean 'expert.' It's
downright embarrassing for a photographer with a backpack full of fancy
equipment to have their eight-year-old use their old camera and get that
photo that everyone's raving about, but it happens. Don't get
mired down in 'equipment lust.' Remember it's the photo that
matters, not what you used
to get it. The 'soul' of the photo matters much more
than technical perfection. While I love nature photography, my interest doesn't stop there. I enjoy a challenge, and I enjoy variety. Thus, if you don't find
me around the Central Coast taking some sort of nature photos or chasing some of the local
wildlife,
you may find me in Yosemite or in the desert. On the other hand,
I may be at Laguna Seca Raceway, or shooting photos of
the local surfers, or at the Live Oak Music Festival. Browse through
my photo galleries at
pbase.com/roberthouse. My camera of choice for several years has been one of the
'ultrazoom'
models, currently a Panasonic Lumix FZ-30, an 8 megapixel model
with a 12x optical zoom range. While I used 35mm cameras for many
years, the ultrazooms didn't exist until digital cameras came
along, and once I discovered them, 35mm-like cameras such as digital
SLR's lost their appeal to me. No more giant lenses and backpacks
full of equipment, the FZ-30 goes with me everywhere, to the top
of the Pinnacles National Monument's High Peaks trail to the top of Yosemite's Half Dome. While I might use small add-on telephoto converters for
Morro Rock's peregrines or other distant subjects, the zoom range
of the camera covers most of what I need most of the time. And
since it's a 'stabilized' lens, I seldom need to carry
a tripod. The camera gives full manual control of all settings,
and while there's a tradeoff in image quality from the larger DSLR cameras, for my purposes, it's more than worth it.
I can still enjoy the activities I choose without having the camera and
its 'necessary' attachments bog me down." You can contact Gary Robertshaw at gary at rshaw
dot com.
Gary Robertshaw
has been a photographer most of
his life. It is always a treat to run into Gary at Morro Rock. Gary
publishes and, in the spirit of community, generously shares most of his
magnificent photos at
pbase.com/roberthouse. Gary's photo entitled Merced
River is a product of many years of experience, as he
explains... "At age 10, I remember wandering around San Francisco with my Brownie camera. I remained active in photography through high school. Later, the lack of a darkroom kept me from getting too involved
in photography. But in the mid-1990's, consumer-priced scanners,
photo printers, and the availability of Adobe Photoshop renewed
my interest. Finally, I could do 'darkroom' work without
having a darkroom, and get closer to what I wanted from the photos. Not long after that, digital cameras began to improve, and as
soon as I found one I could afford that gave a decent printed
result, my film cameras found the shelf and never left. The Central Coast is really a photographer's paradise. Opportunities
for nature photography abound as we are surrounded by beautiful scenic
areas and wildlife. Capturing that real-life beauty in a two-dimensional
photo can be a challenge, but there are a few fairly simple things
that can make a big difference in your photos. Get up early; stay out late. Dusk and dawn lighting,
as well as the angle of the sun in the earlier part of the morning
and later part of the afternoon, can make the difference between
a technically-nice, but 'blah' photo and a photo with
dramatic impact. I've been out in Yosemite Valley in mid-summer-full-blown
tourist season, at daybreak, and been the only human I could see
or hear in any direction. Get out of the car. It's easy to want to grab your camera,
hop out of the car, assess the scene, and decide whether there's
anything to photograph or not. You'll never find out if you do
it that way. Grab a jacket, lock the door, and walk. You'll be
amazed what you find that you didn't notice from that 'convenient'
location next to your car. Take your time. Every animal hides
when they see you coming. Walk slowly, and take in your environment... you're
probably walking right by a great photo. When you find a nice
spot, sit down. Be quiet. Watch. When things become 'normal'
the wildlife goes back to their normal behavior, but it may take
a while, so be patient. Nothing is less conducive to getting good
photos than a photographer in a hurry. Learn to use the camera's basic
settings. Even the simplest digitals usually have exposure
value, or 'EV' settings. Learn to use them; they can make a huge difference, especially
when you're out in that morning or afternoon light. By all means, if you know how to use f/stops and shutter speeds
to your advantage, do it; but if not, or if you don't have time,
the EV settings are a good quick way of adjusting the camera's
exposure to your liking. Shooting in more dramatic lighting is
more difficult, but the camera doesn't know this; those settings
are the way to tell the camera what you want. Give yourself some
'photo time.' Give your
family or friends a break; if you're out with them, don't expect
them to stop at every photo-op you see. Sure, take your camera,
and use it, but make your priority enjoying your time with the
folks you're with. Then, when they go off to watch TV,
etc., grab your camera and head on out. Now you can go as slowly
as you want, where you want, and give priority to getting some
good photos. Use photo editing software. It is very seldom
that a camera will produce a photo that can't be improved with just some
basic adjustments in, for example,
Adobe Photoshop Elements. These editors contain
'quick fix' solutions as well
as more advanced adjustments like levels and sharpening, so you
can start with quick fixes, and if you like the results, maybe
learn a little more as you go. Crop out the unnecessary parts
of the photo; level the horizon or vertical subject, it makes
a big difference. It will be worth it. Don't blame the camera.
The simplest camera can produce excellent photos in the 'right' hands.
'Right,' in this case, doesn't necessarily mean 'expert.' It's
downright embarrassing for a photographer with a backpack full of fancy
equipment to have their eight-year-old use their old camera and get that
photo that everyone's raving about, but it happens. Don't get
mired down in 'equipment lust.' Remember it's the photo that
matters, not what you used
to get it. The 'soul' of the photo matters much more
than technical perfection. While I love nature photography, my interest doesn't stop there. I enjoy a challenge, and I enjoy variety. Thus, if you don't find
me around the Central Coast taking some sort of nature photos or chasing some of the local
wildlife,
you may find me in Yosemite or in the desert. On the other hand,
I may be at Laguna Seca Raceway, or shooting photos of
the local surfers, or at the Live Oak Music Festival. Browse through
my photo galleries at
pbase.com/roberthouse. My camera of choice for several years has been one of the
'ultrazoom'
models, currently a Panasonic Lumix FZ-30, an 8 megapixel model
with a 12x optical zoom range. While I used 35mm cameras for many
years, the ultrazooms didn't exist until digital cameras came
along, and once I discovered them, 35mm-like cameras such as digital
SLR's lost their appeal to me. No more giant lenses and backpacks
full of equipment, the FZ-30 goes with me everywhere, to the top
of the Pinnacles National Monument's High Peaks trail to the top of Yosemite's Half Dome. While I might use small add-on telephoto converters for
Morro Rock's peregrines or other distant subjects, the zoom range
of the camera covers most of what I need most of the time. And
since it's a 'stabilized' lens, I seldom need to carry
a tripod. The camera gives full manual control of all settings,
and while there's a tradeoff in image quality from the larger DSLR cameras, for my purposes, it's more than worth it.
I can still enjoy the activities I choose without having the camera and
its 'necessary' attachments bog me down." You can contact Gary Robertshaw at gary at rshaw
dot com.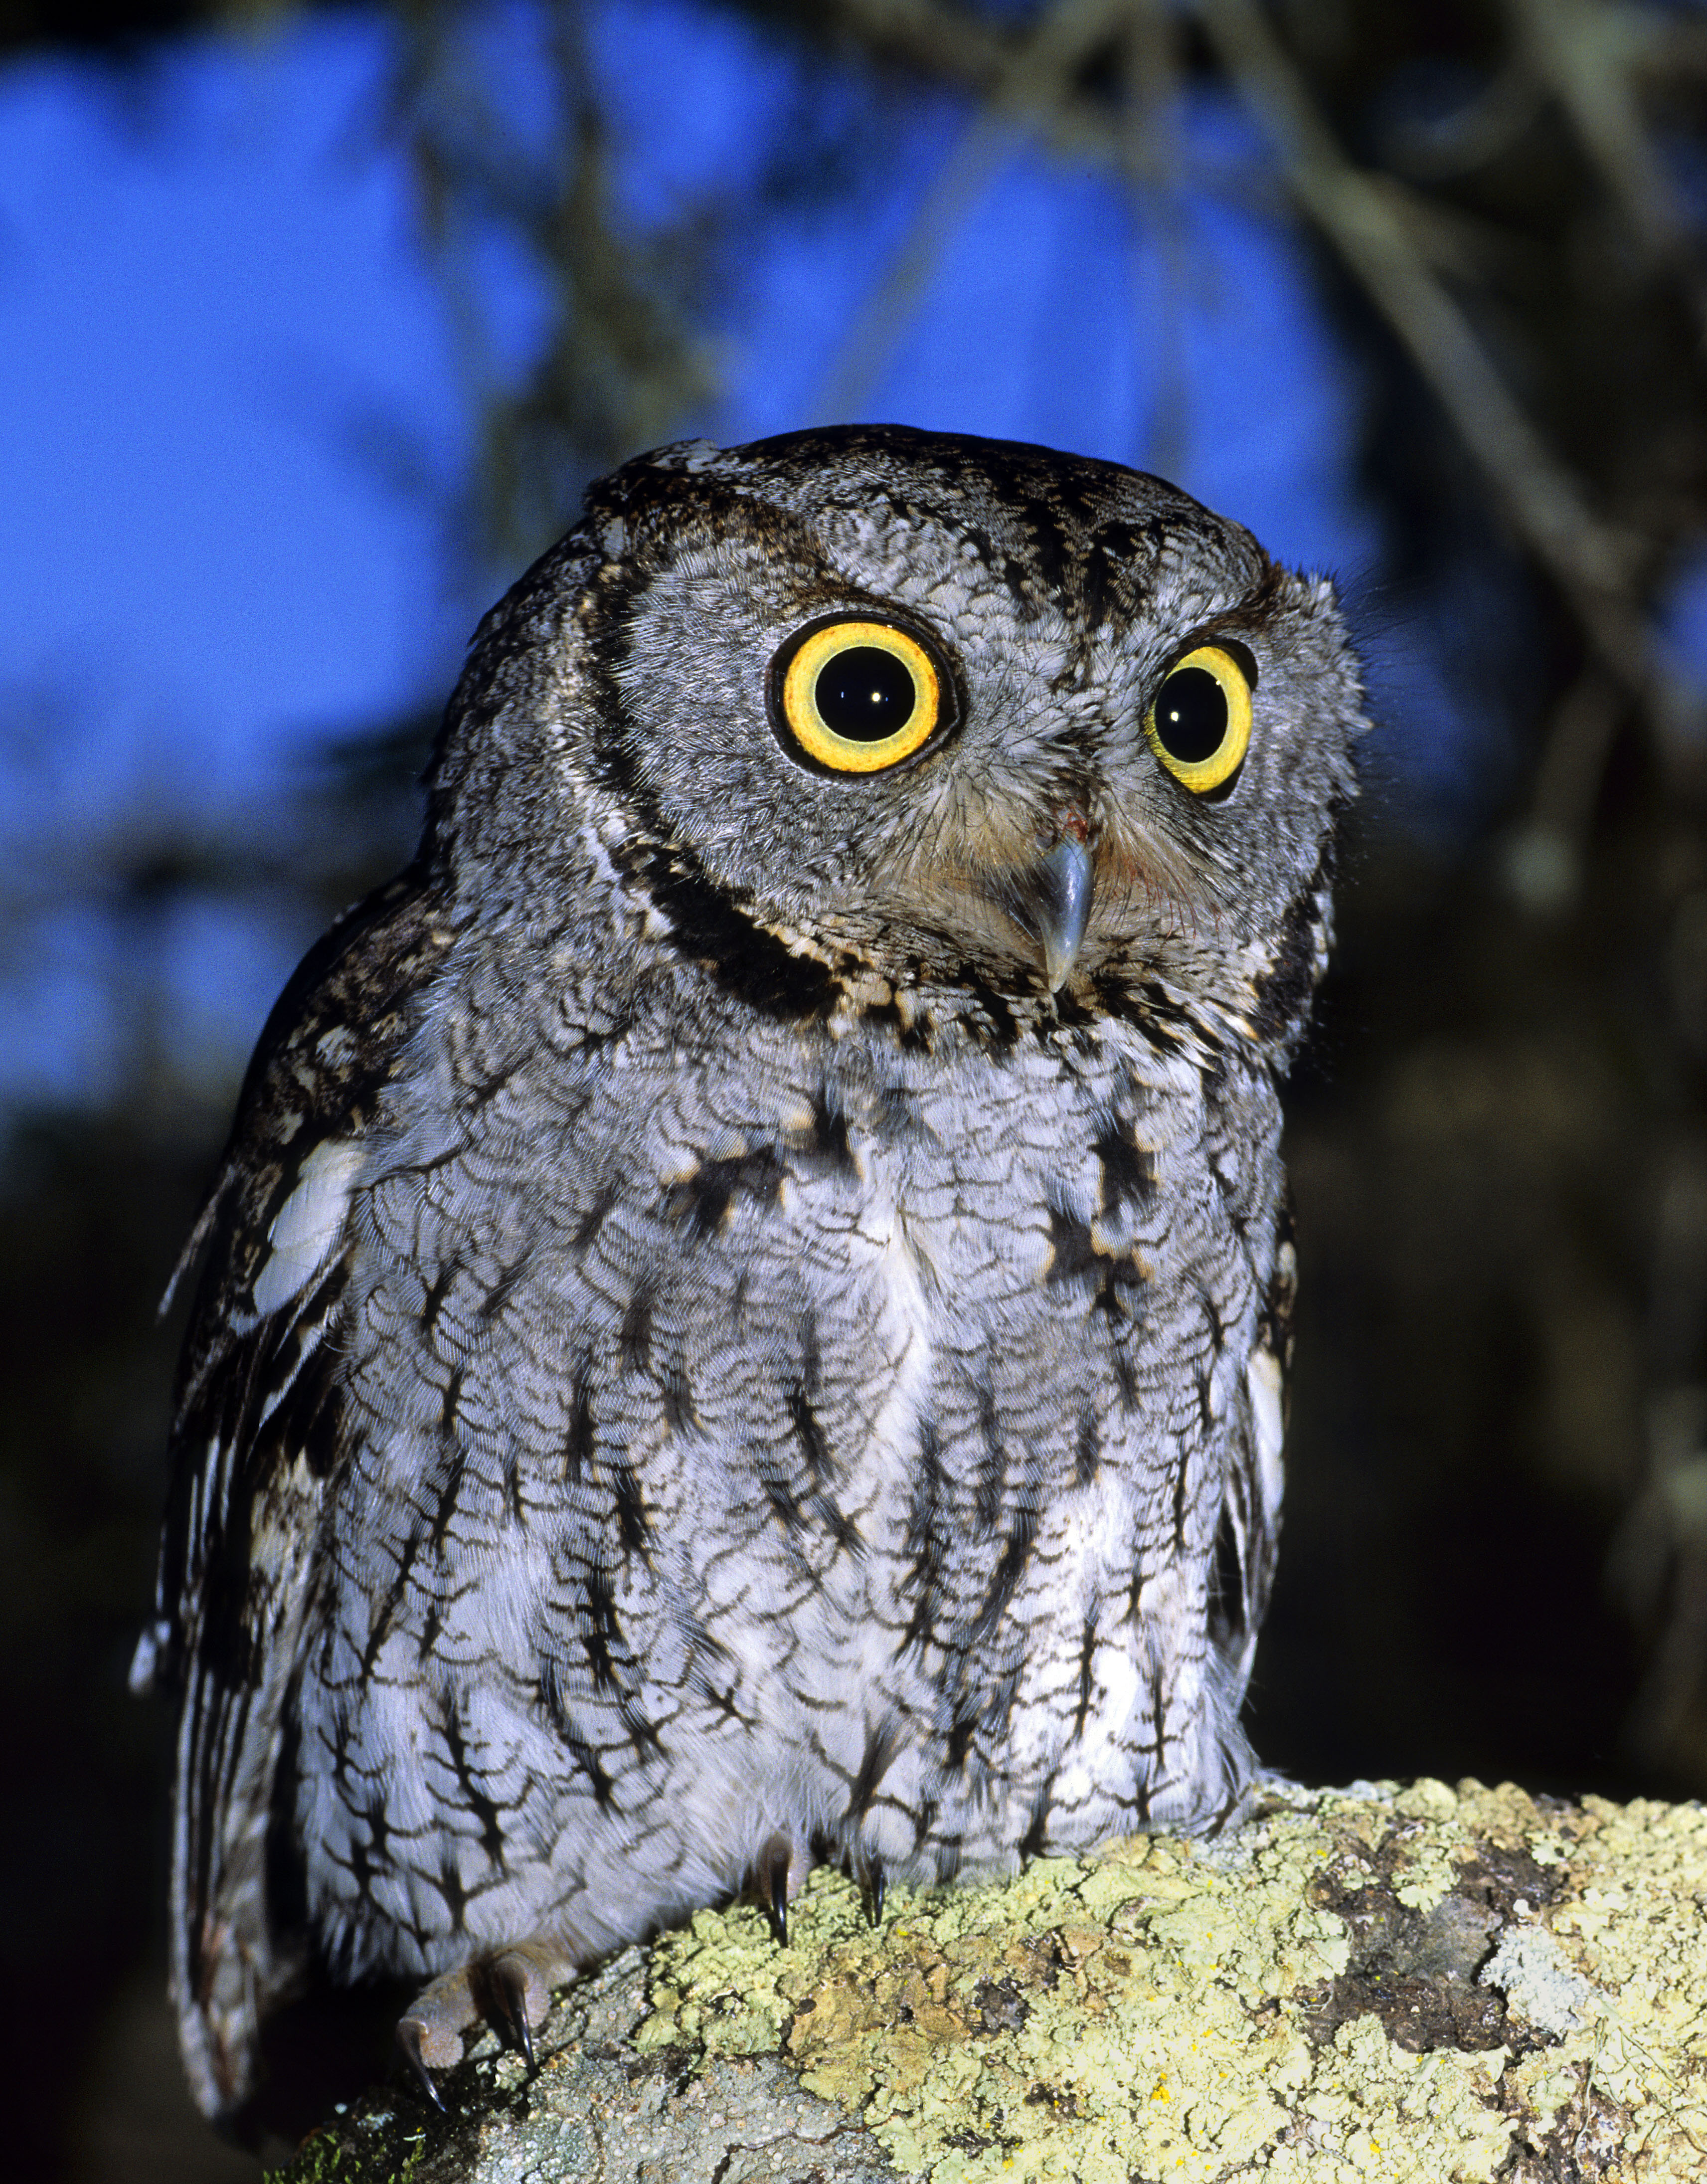
Photo © Dennis Sheridan
(click thumbnail above to see full-sized version)
Western Screech Owl, Los Osos Oaks Reserve, by Dennis Sheridan
1024x768 wallpaper version
1280x1024 wallpaper version
1600x1200 wallpaper version
800x600 wallpaper version
 Dennis
Sheridan is another local icon, a
native Californian who grew up in Arcadia.
It
would be the unusual local nature buff who has not encountered one or
more of Dennis' innovative presentations featuring astounding photos and
often accompanied by live exotic insects. Dennis graduated from
Cal Poly Pomona
with a degree in biology, specialty entomology. He moved to Morro Bay
in 1974 and began a career in photography, concentrating on birds of
prey and native wildlife, as well as fungi, lichens, insects,
wildflowers, and California scenery. Dennis has traveled throughout the
Western United States photographing nature, and in recent years has
expanded his horizons to Alaska, Canada, Mexico, Europe, Costa Rica,
Chile, Ecuador, Belize, Peru, Australia, China, New
Zealand, Indonesia, Malaysia, Borneo, Nepal and East Africa. His animal
photographs show an amazing attention to detail, and he does fine
quality macro photography of very small subjects. He also does
photographic shoots for non-profit and commercial clients. Dennis
has published
extensively, teaches photography classes, and contributes his
photography and naturalist services to
many societies and institutions. Learn much more about Dennis'
work at
dennissheridan.com. I caught Dennis in
between two hectic field assignments, and was fortunate to coax the
following advice from him. "I recently switched from shooting slide film to digital. I am a Canon
user, and have been for more than 20 years. I use the Canon 20D, and I
use telephoto and macro lenses, image stabilization and add flash with
either macro flash brackets or teleflash. While my focus originally
concentrated on wild birds and macro subjects including fungus, plants,
reptiles, insects and arthropods, I am increasingly interested in
photographing people and landscapes. A photographer is an artist, and
should be open to changes in concentration and technique, and I have
changed just about everything I originally started with -- techniques,
ideas, camera, lenses, and choice of subject. As a result I am
constantly learning about new areas in photography, and I would have to
say that I have learned something from nearly everyone I contact in this
regard. I also teach whenever I can, and find that this also influences
my thoughts, leading in new directions.
Practical advice from me would be to shoot many images of the same
subject. While this was expensive 'insurance' with the film camera, it
does not cost anything extra with the digital camera. I have some
trouble getting rid of my in-camera duplicates obtained in this way, so
I would also advise a heavy editing effort, even though it takes time. My love of photography has resulted in very large files, and time spent
up-front is time saved later on by being distracted with too many of the
same pose.
Another thought involves the macro and animal photography that I love to
do. The animals are typically trying to escape or hide, which poses an
extra difficulty. When I have captive animals to photograph I try to
re-create a natural looking background for them. This involves knowing
where the animals live, and may require some hunting around for
appropriate rocks, leaves, dirt, trees or other natural items. The
animals themselves are not restricted from movement within the
background, so it is important to be patient in waiting for a good pose
and quick to take advantage by clicking the shutter.
With non-captive animals found in the wild, it is still important to
keep foreign materials out of the picture, and it may be necessary to
clean up the environment to make the setting seem more natural. Photoshopping out the distractions is not always quick and it is not
usually undetectable. My main skills are not in computer operations,
they are in photography, biology and natural history, so I try to get
the photograph right in the first place. With small macro subjects the
most difficult task is to get a good pose from a small animal, such as a
ladybird beetle. The background is very important to show the natural
history of the animal. With a larger animal, such as a lion or bird or
even a mouse, if the animal is free to move it may not stay around long
enough in photographable pose to get the job done, so not all of these
encounters are successful. In addition, some of the animals may pose a
danger to the photographer, which usually makes the photo shoot a whole
lot more interesting!
People pose a completely different challenge, particularly if you don’t
know them or speak their language. I try to establish a connection with
people I want to photograph, so I learn a few new words, smile and am
certainly interested in whatever they are doing, and ask them with hand
signals if they would be willing to be a subject. This works very well,
and I never pay for photographing a person. One of my favorite
photos is this Western Screech Owl, which I photographed nearby
in the
Los Osos Oaks State Reserve." You can contact Dennis Sheridan at dennissher at
sbcglobal dot net.
Dennis
Sheridan is another local icon, a
native Californian who grew up in Arcadia.
It
would be the unusual local nature buff who has not encountered one or
more of Dennis' innovative presentations featuring astounding photos and
often accompanied by live exotic insects. Dennis graduated from
Cal Poly Pomona
with a degree in biology, specialty entomology. He moved to Morro Bay
in 1974 and began a career in photography, concentrating on birds of
prey and native wildlife, as well as fungi, lichens, insects,
wildflowers, and California scenery. Dennis has traveled throughout the
Western United States photographing nature, and in recent years has
expanded his horizons to Alaska, Canada, Mexico, Europe, Costa Rica,
Chile, Ecuador, Belize, Peru, Australia, China, New
Zealand, Indonesia, Malaysia, Borneo, Nepal and East Africa. His animal
photographs show an amazing attention to detail, and he does fine
quality macro photography of very small subjects. He also does
photographic shoots for non-profit and commercial clients. Dennis
has published
extensively, teaches photography classes, and contributes his
photography and naturalist services to
many societies and institutions. Learn much more about Dennis'
work at
dennissheridan.com. I caught Dennis in
between two hectic field assignments, and was fortunate to coax the
following advice from him. "I recently switched from shooting slide film to digital. I am a Canon
user, and have been for more than 20 years. I use the Canon 20D, and I
use telephoto and macro lenses, image stabilization and add flash with
either macro flash brackets or teleflash. While my focus originally
concentrated on wild birds and macro subjects including fungus, plants,
reptiles, insects and arthropods, I am increasingly interested in
photographing people and landscapes. A photographer is an artist, and
should be open to changes in concentration and technique, and I have
changed just about everything I originally started with -- techniques,
ideas, camera, lenses, and choice of subject. As a result I am
constantly learning about new areas in photography, and I would have to
say that I have learned something from nearly everyone I contact in this
regard. I also teach whenever I can, and find that this also influences
my thoughts, leading in new directions.
Practical advice from me would be to shoot many images of the same
subject. While this was expensive 'insurance' with the film camera, it
does not cost anything extra with the digital camera. I have some
trouble getting rid of my in-camera duplicates obtained in this way, so
I would also advise a heavy editing effort, even though it takes time. My love of photography has resulted in very large files, and time spent
up-front is time saved later on by being distracted with too many of the
same pose.
Another thought involves the macro and animal photography that I love to
do. The animals are typically trying to escape or hide, which poses an
extra difficulty. When I have captive animals to photograph I try to
re-create a natural looking background for them. This involves knowing
where the animals live, and may require some hunting around for
appropriate rocks, leaves, dirt, trees or other natural items. The
animals themselves are not restricted from movement within the
background, so it is important to be patient in waiting for a good pose
and quick to take advantage by clicking the shutter.
With non-captive animals found in the wild, it is still important to
keep foreign materials out of the picture, and it may be necessary to
clean up the environment to make the setting seem more natural. Photoshopping out the distractions is not always quick and it is not
usually undetectable. My main skills are not in computer operations,
they are in photography, biology and natural history, so I try to get
the photograph right in the first place. With small macro subjects the
most difficult task is to get a good pose from a small animal, such as a
ladybird beetle. The background is very important to show the natural
history of the animal. With a larger animal, such as a lion or bird or
even a mouse, if the animal is free to move it may not stay around long
enough in photographable pose to get the job done, so not all of these
encounters are successful. In addition, some of the animals may pose a
danger to the photographer, which usually makes the photo shoot a whole
lot more interesting!
People pose a completely different challenge, particularly if you don’t
know them or speak their language. I try to establish a connection with
people I want to photograph, so I learn a few new words, smile and am
certainly interested in whatever they are doing, and ask them with hand
signals if they would be willing to be a subject. This works very well,
and I never pay for photographing a person. One of my favorite
photos is this Western Screech Owl, which I photographed nearby
in the
Los Osos Oaks State Reserve." You can contact Dennis Sheridan at dennissher at
sbcglobal dot net. 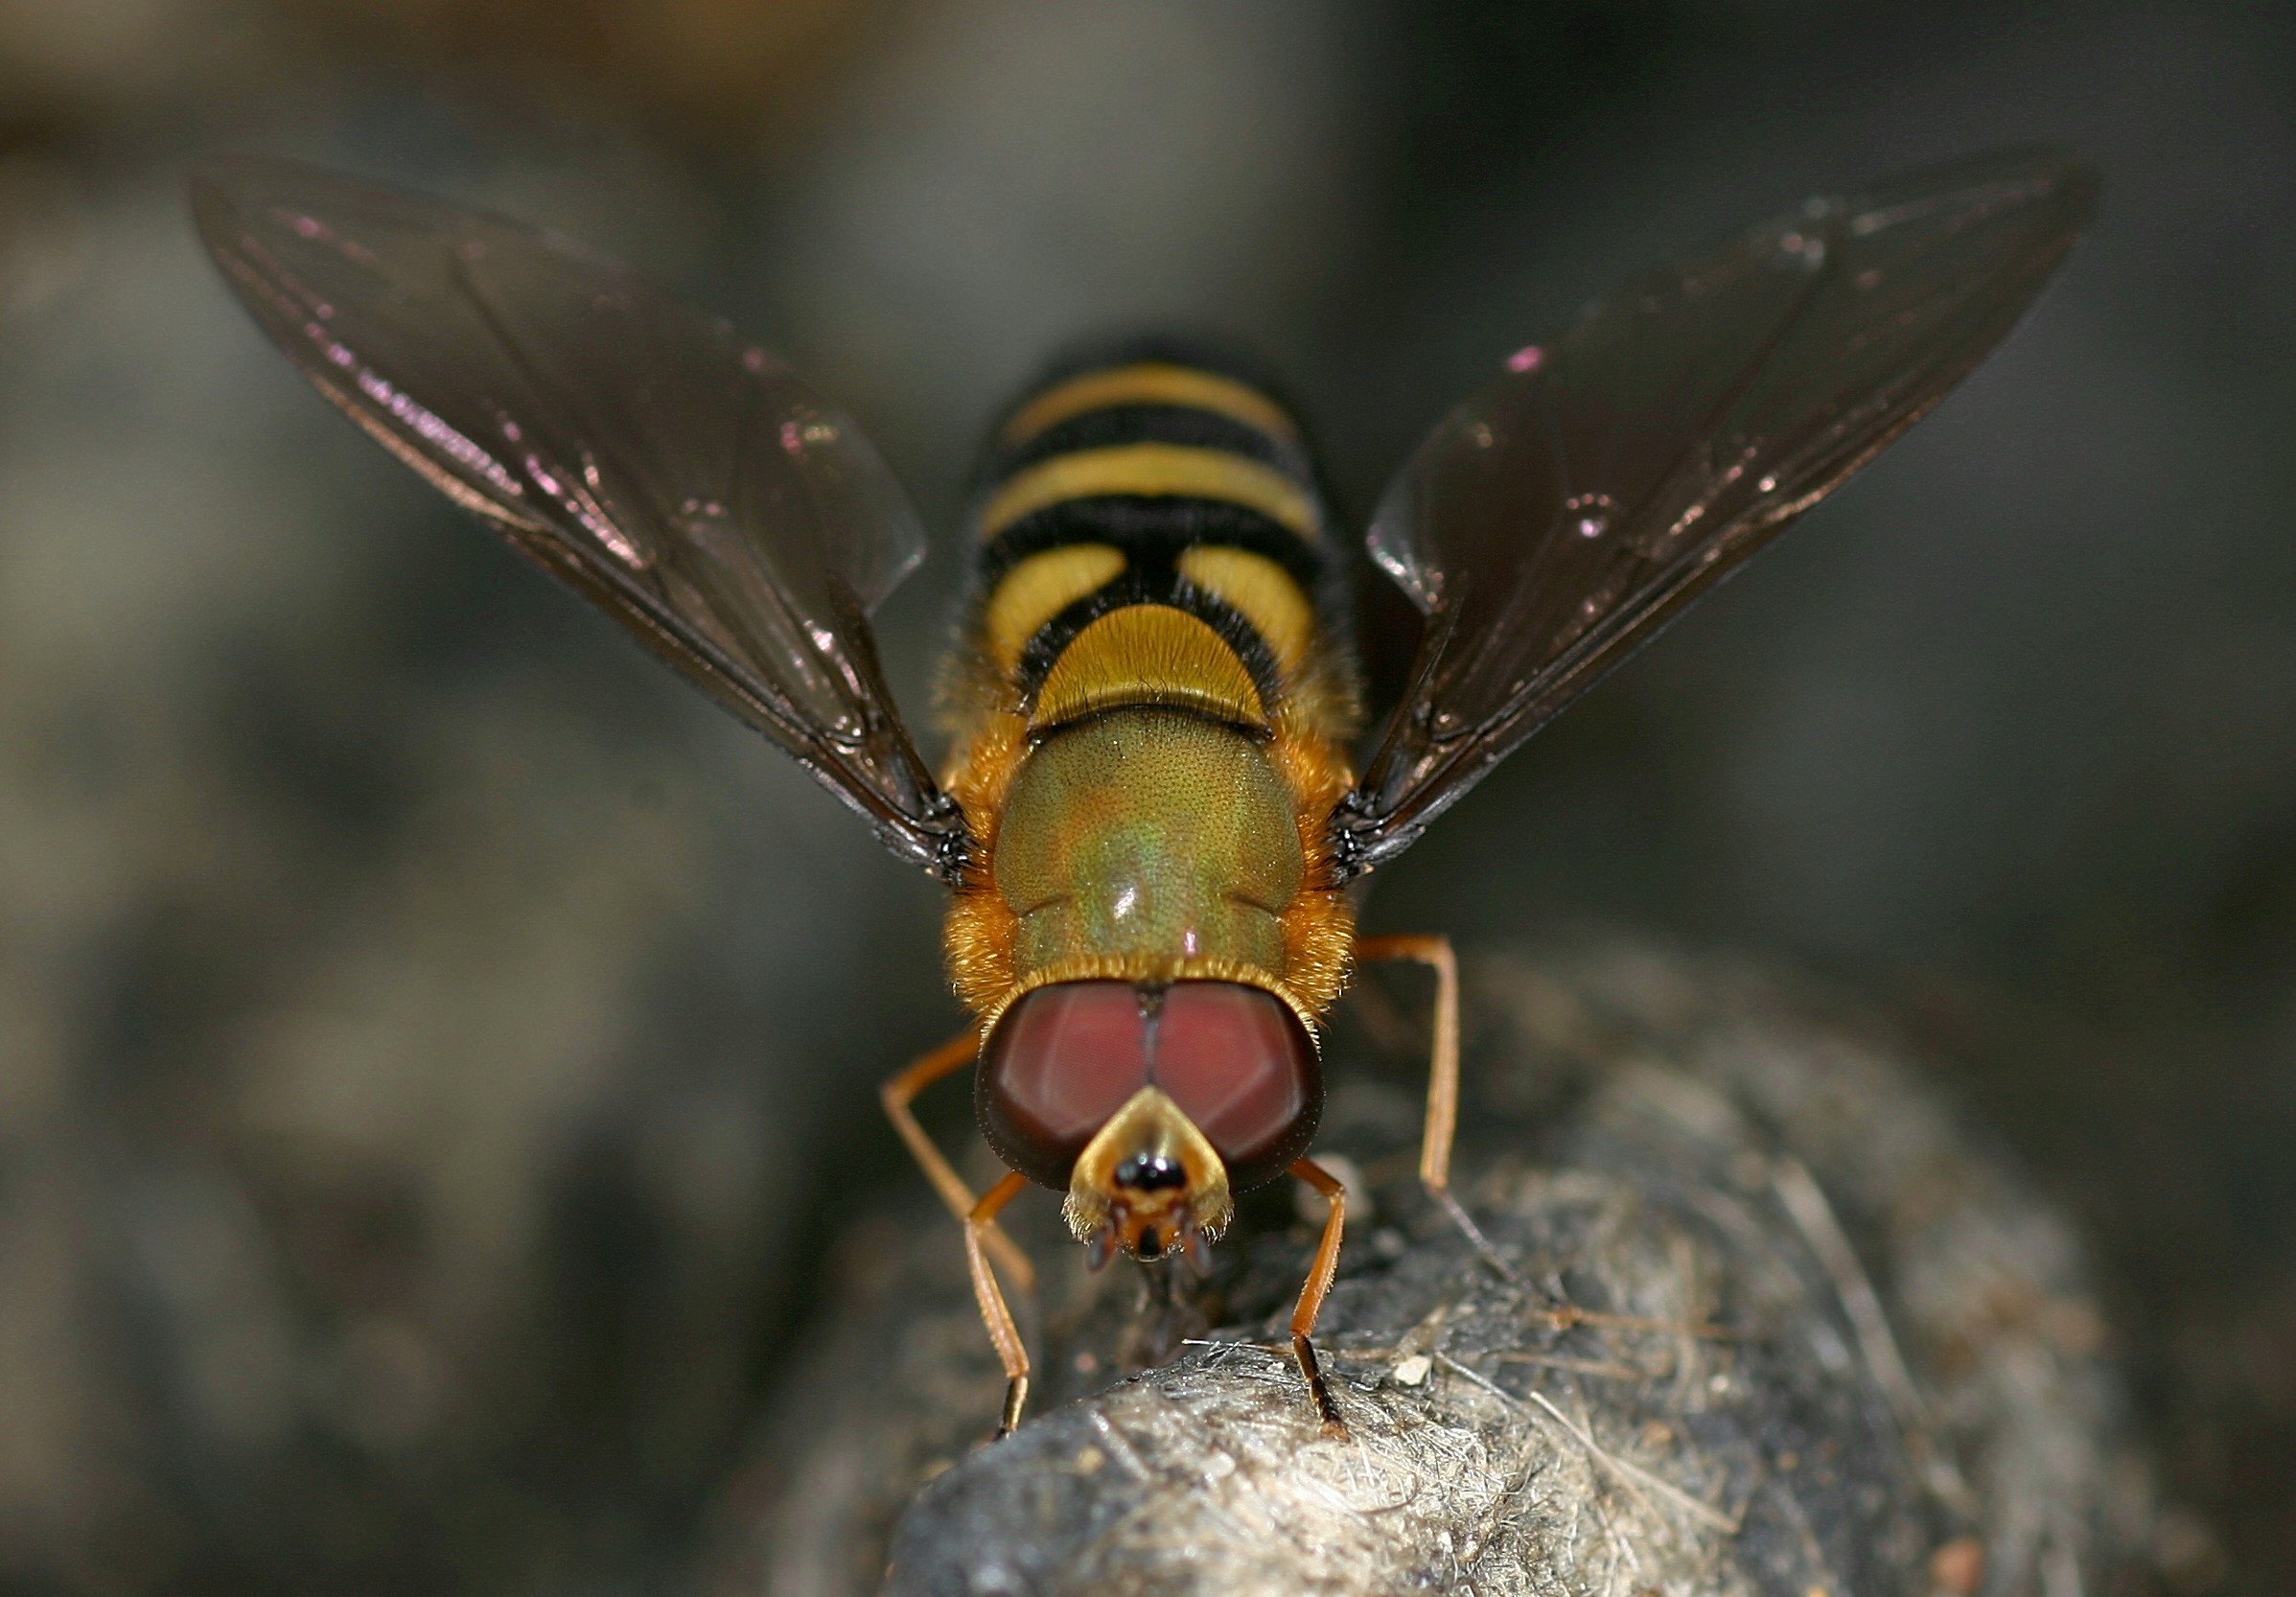
Photo © Greg Smith
(click thumbnail above to see full-sized version)
Ecuadorian Fly, by Greg Smith
1024x768 wallpaper version
1280x1024 wallpaper version
1600x1200 wallpaper version
1920x1200 wide-screen wallpaper version
800x600 wallpaper version
 Greg
Smith, as Superintendent,
Coastal Sector of California State Parks,
manages the State Parks from Avila Beach north to Highway 46. His
tenure with the department started in 1978, and as an ecologist he
developed an intimate knowledge of the resources in these parks. It would be
a rare
CCNHA Nature Notes
reader who has not heard of Greg Smith or some of his magnificent
photo work. As an
avid landscape and wildlife photographer, Greg has been able to take
advantage of the outstanding resources found on the Central Coast. For
the past 32 years he has had the opportunity of exploring San Luis
Obispo County and sharing its secrets through his photographs.
Many
of Greg's bird photos are published on
Mike Stiles'
SLO County Birds
Photo Gallery and
the
Morro Coast Audubon
Photo Gallery.
Soon you will be able to view
Greg’s photographs at
wildnaturephotos.com. Greg says "In my spare time I enjoy photography, birding and leading
natural history tours to Russia, Alaska, the Antarctic and South
America. I am a Canon-man all the way, with lens
ranging from macro to super telephoto. I feel that the
image stabilization built into the Canon lenses and the
Digic II
processor in the camera bodies make these components excellent choices
for photographing nature." When asked how his
experience and knowledge has helped him develop a philosophy that guides
his photography, he replied "...it has to be natural. I
advocate assessing the scene and anticipating where the animal is heading,
both of which help you get the 'natural' shot. It isn’t necessary
to take a photograph if your intuitive feeling is that the setting
doesn’t satisfy your personal sense of balance, lighting and color.
As challenging as it may be, I practice patience until the animal, the
lighting, the clouds provide the opportunity to shoot. My wildlife
photography goal has been to segregate my results into two categories:
one to get a personal, up close feeling of the subject, while the second
sets the animal up as a complement to the scenery or its habitat
-- neither the habitat
nor the animal dominates the photograph. As for our outstanding
landscapes, I am always looking for techniques that allow me to shoot
the photograph from an undiscovered perspective. Subjects along
the Central Coast are unlimited! Stop and look at the insects
visiting a leaf, the patterns of sand in a receding wave, or the fog as
it envelops one or all of the
Seven Sisters. Visit your favorite scenic sites or wildlife
viewing areas at different times of the day, whether it is clear and
sunny or drippy fog. All of these situations add to the challenge
and satisfaction of photographing the Central Coast. To create my
Ecuadorian Fly photograph, I noticed this fly coming repeatedly
to the same location, so I moved forward, put myself in a prone position
and let the fly calm down and return. It did, and allowed me to
take numerous shots with a 100mm macro f.2.8 lens and an MT-24EX macro
twin lite -- all Canon." You
can contact Greg Smith at slobird at aol dot com.
Greg
Smith, as Superintendent,
Coastal Sector of California State Parks,
manages the State Parks from Avila Beach north to Highway 46. His
tenure with the department started in 1978, and as an ecologist he
developed an intimate knowledge of the resources in these parks. It would be
a rare
CCNHA Nature Notes
reader who has not heard of Greg Smith or some of his magnificent
photo work. As an
avid landscape and wildlife photographer, Greg has been able to take
advantage of the outstanding resources found on the Central Coast. For
the past 32 years he has had the opportunity of exploring San Luis
Obispo County and sharing its secrets through his photographs.
Many
of Greg's bird photos are published on
Mike Stiles'
SLO County Birds
Photo Gallery and
the
Morro Coast Audubon
Photo Gallery.
Soon you will be able to view
Greg’s photographs at
wildnaturephotos.com. Greg says "In my spare time I enjoy photography, birding and leading
natural history tours to Russia, Alaska, the Antarctic and South
America. I am a Canon-man all the way, with lens
ranging from macro to super telephoto. I feel that the
image stabilization built into the Canon lenses and the
Digic II
processor in the camera bodies make these components excellent choices
for photographing nature." When asked how his
experience and knowledge has helped him develop a philosophy that guides
his photography, he replied "...it has to be natural. I
advocate assessing the scene and anticipating where the animal is heading,
both of which help you get the 'natural' shot. It isn’t necessary
to take a photograph if your intuitive feeling is that the setting
doesn’t satisfy your personal sense of balance, lighting and color.
As challenging as it may be, I practice patience until the animal, the
lighting, the clouds provide the opportunity to shoot. My wildlife
photography goal has been to segregate my results into two categories:
one to get a personal, up close feeling of the subject, while the second
sets the animal up as a complement to the scenery or its habitat
-- neither the habitat
nor the animal dominates the photograph. As for our outstanding
landscapes, I am always looking for techniques that allow me to shoot
the photograph from an undiscovered perspective. Subjects along
the Central Coast are unlimited! Stop and look at the insects
visiting a leaf, the patterns of sand in a receding wave, or the fog as
it envelops one or all of the
Seven Sisters. Visit your favorite scenic sites or wildlife
viewing areas at different times of the day, whether it is clear and
sunny or drippy fog. All of these situations add to the challenge
and satisfaction of photographing the Central Coast. To create my
Ecuadorian Fly photograph, I noticed this fly coming repeatedly
to the same location, so I moved forward, put myself in a prone position
and let the fly calm down and return. It did, and allowed me to
take numerous shots with a 100mm macro f.2.8 lens and an MT-24EX macro
twin lite -- all Canon." You
can contact Greg Smith at slobird at aol dot com.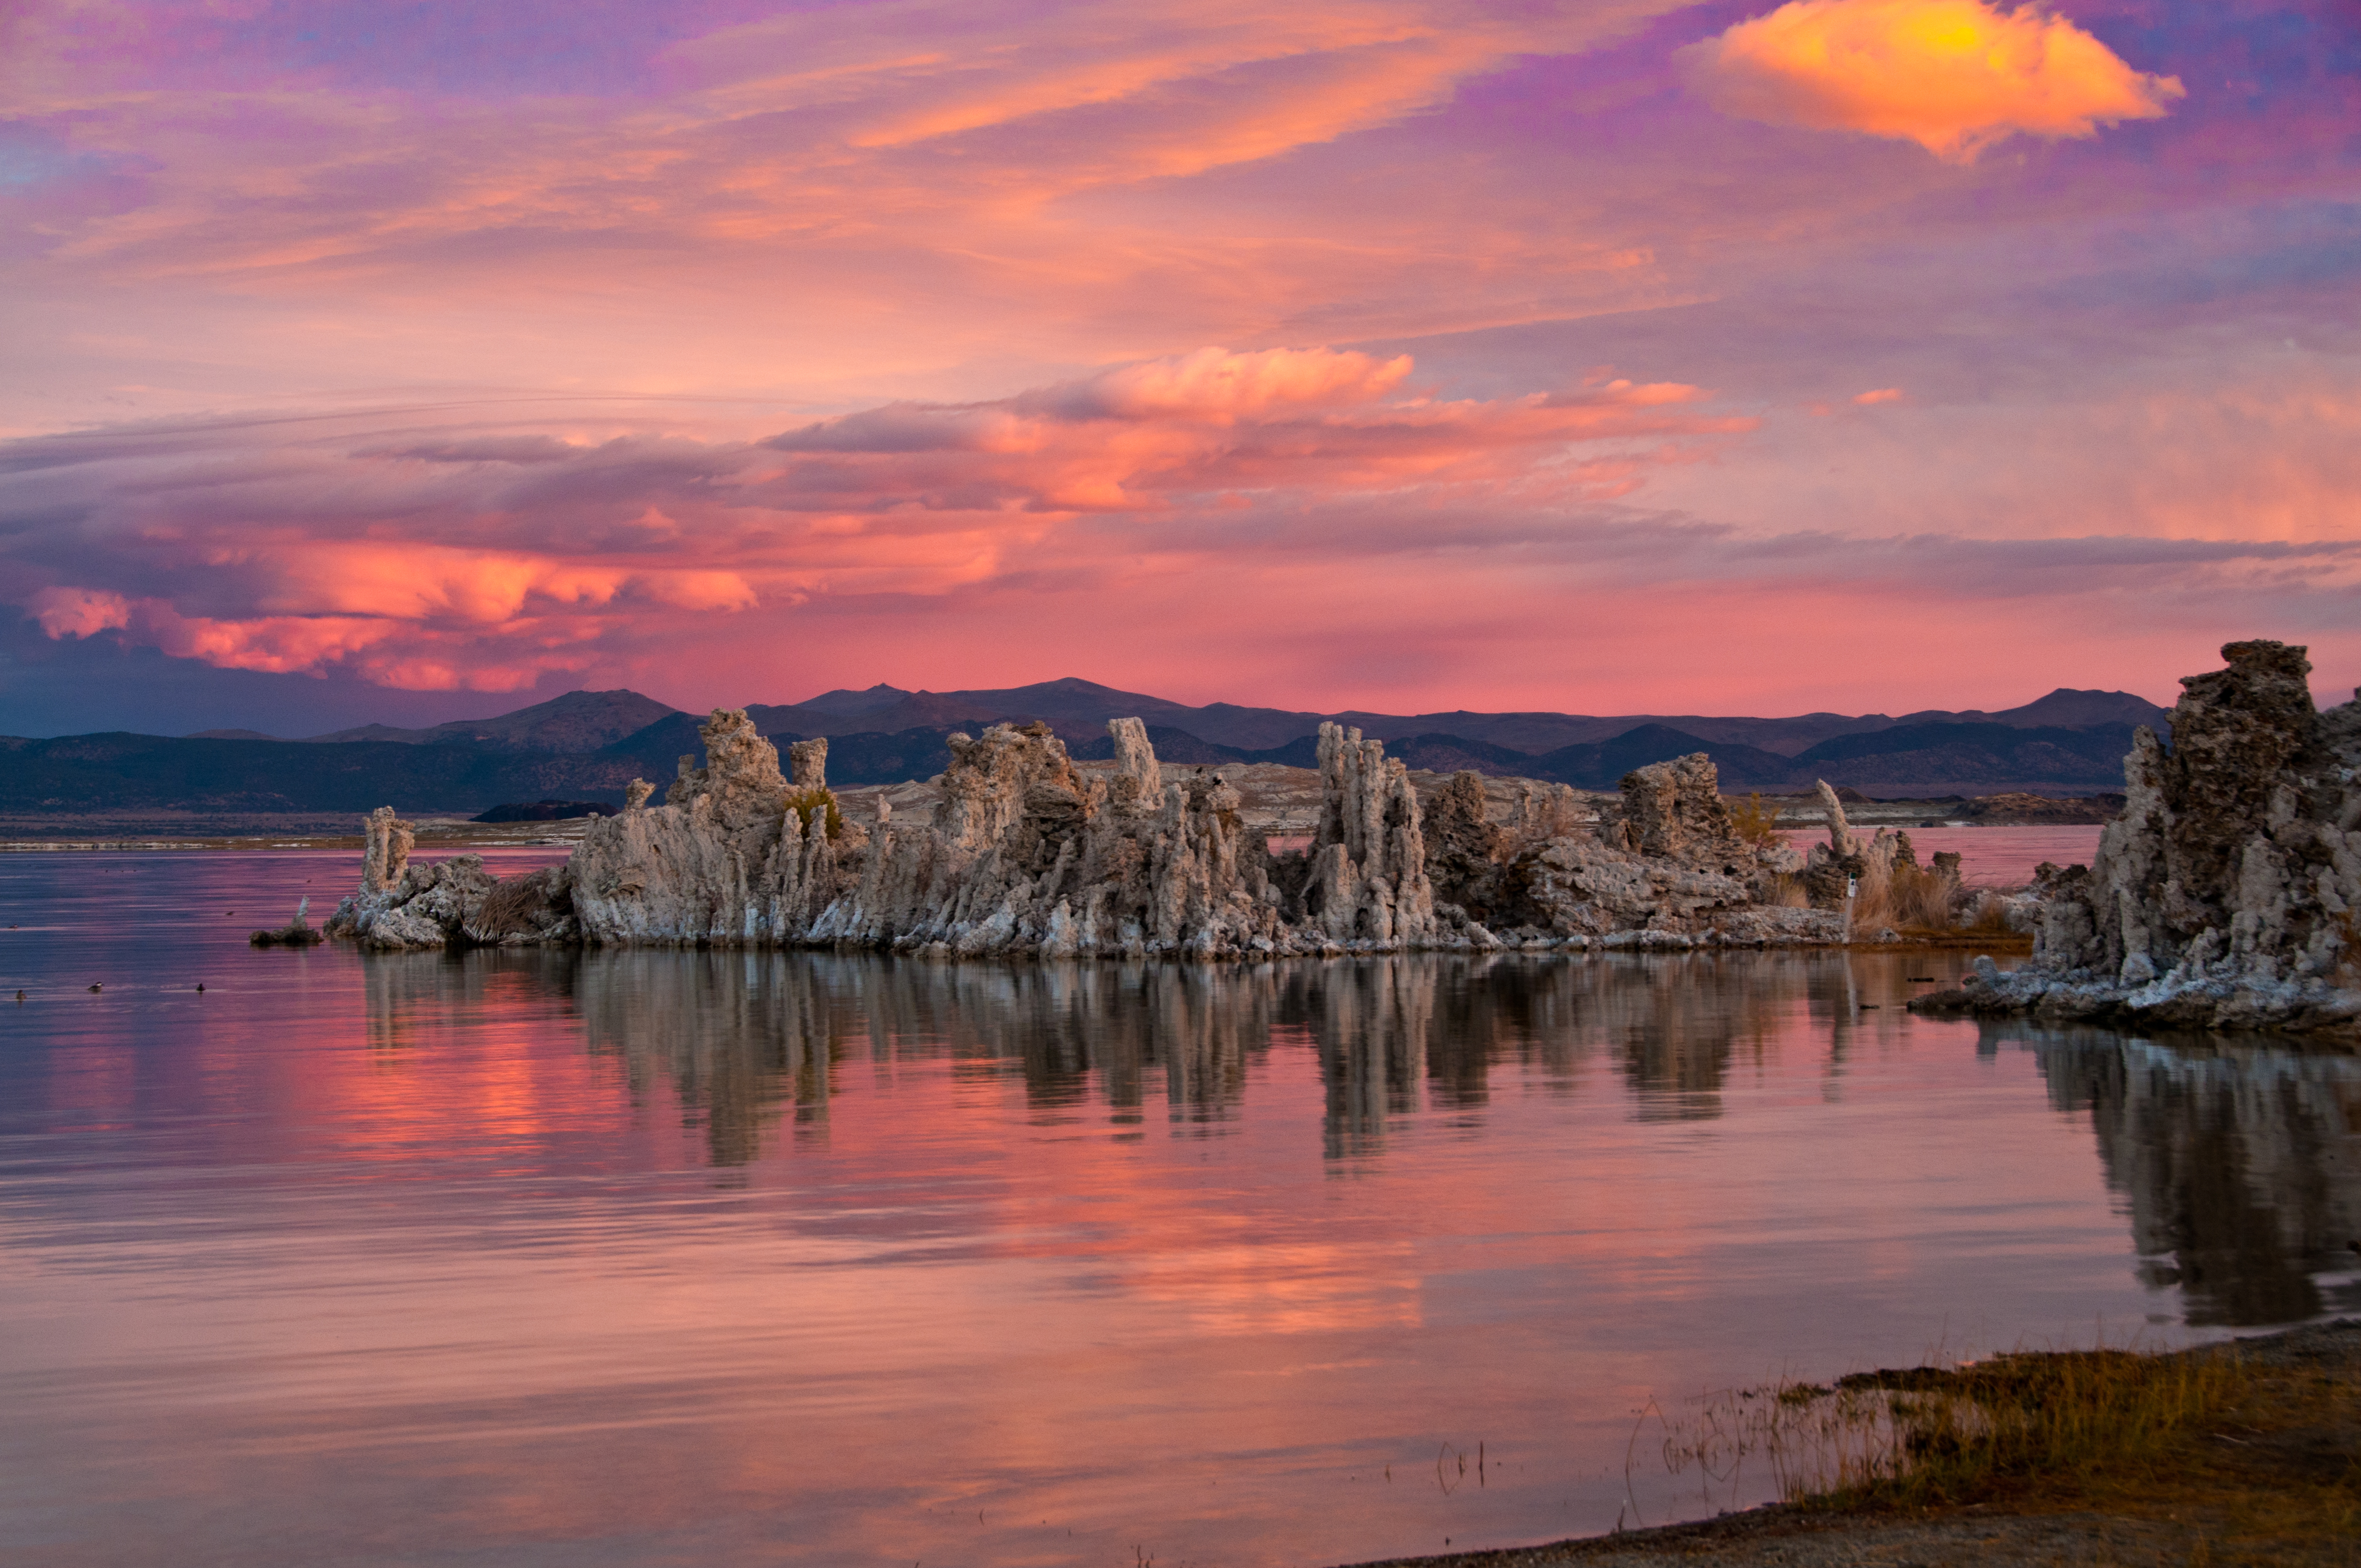
Mono Lake at Sunrise, by Jerry Kirkhart
(click thumbnail above to see full-sized version)
 Jerry Kirkhart, a CA State Park Docent, is a retired Biology/Zoology college instructor, and is not new to photography, which has been used in his teaching for over 43 years. However, photography was almost always used only for teaching purposes, with very little thought given to camera settings or post processing, as film was the primary method used before digital. Jerry reasoned that the camera would figure out the best settings. The images used for teaching were processed into slides for classroom use in order to enhance each subject. Once retired, in 2006, Jerry's love for wildlife photography, including tide pool photography, turned into a passion of wanting to improve using digital photography techniques. Jerry says "My basic set up is a Nikon D300 camera, with three lenses, an 18-300 mm, 80-400 mm, and 105 mm macro, plus an RRS tripod." Jerry has been published in Popular Photography and has had his images used on various interpretive panels in places like the Morro Bay Natural History Museum, the Montaña de Oro Ranch House, and a few others. Many of Jerry's images are seen and first discovered on Flickr, and are then are used for academic publications, blogs, and educational sites. Jerry Kirkhart's Flickr site flickr.com/photos/jkirkhart35 includes 3659 images and 91 sets. According to flickr, his most popular image, Mono Lake at Sunrise," shown here, was taken early one morning at Mono Lake, CA. and had 120 favs. The camera set up was for 0.25 sec, f/9.0, ISO 200, +2/3 EV, in manual mode, as Jerry is now telling the camera what to do, and seldom uses automatic settings. He primarily uses Adobe Lightroom for his post-processing. However, very little was done to this image. The color of the sky did not stay the color you see very long, and it looked just like what you see in this image. Jerry was concentrating on the Tufa as the sunrise covered the area, and he captured this image when he saw the pink sky and Tufa reflections. Photography is a relatively new hobby for Jerry, but because of his passion for and mastery of photography, he has made many new friends with the SLO camera club, the photomorrobay Yahoo! and Flickr Groups, and the Central Coast State Parks Association . You can email Jerry Kirkhart @ jkirkhart35@gmail.com.
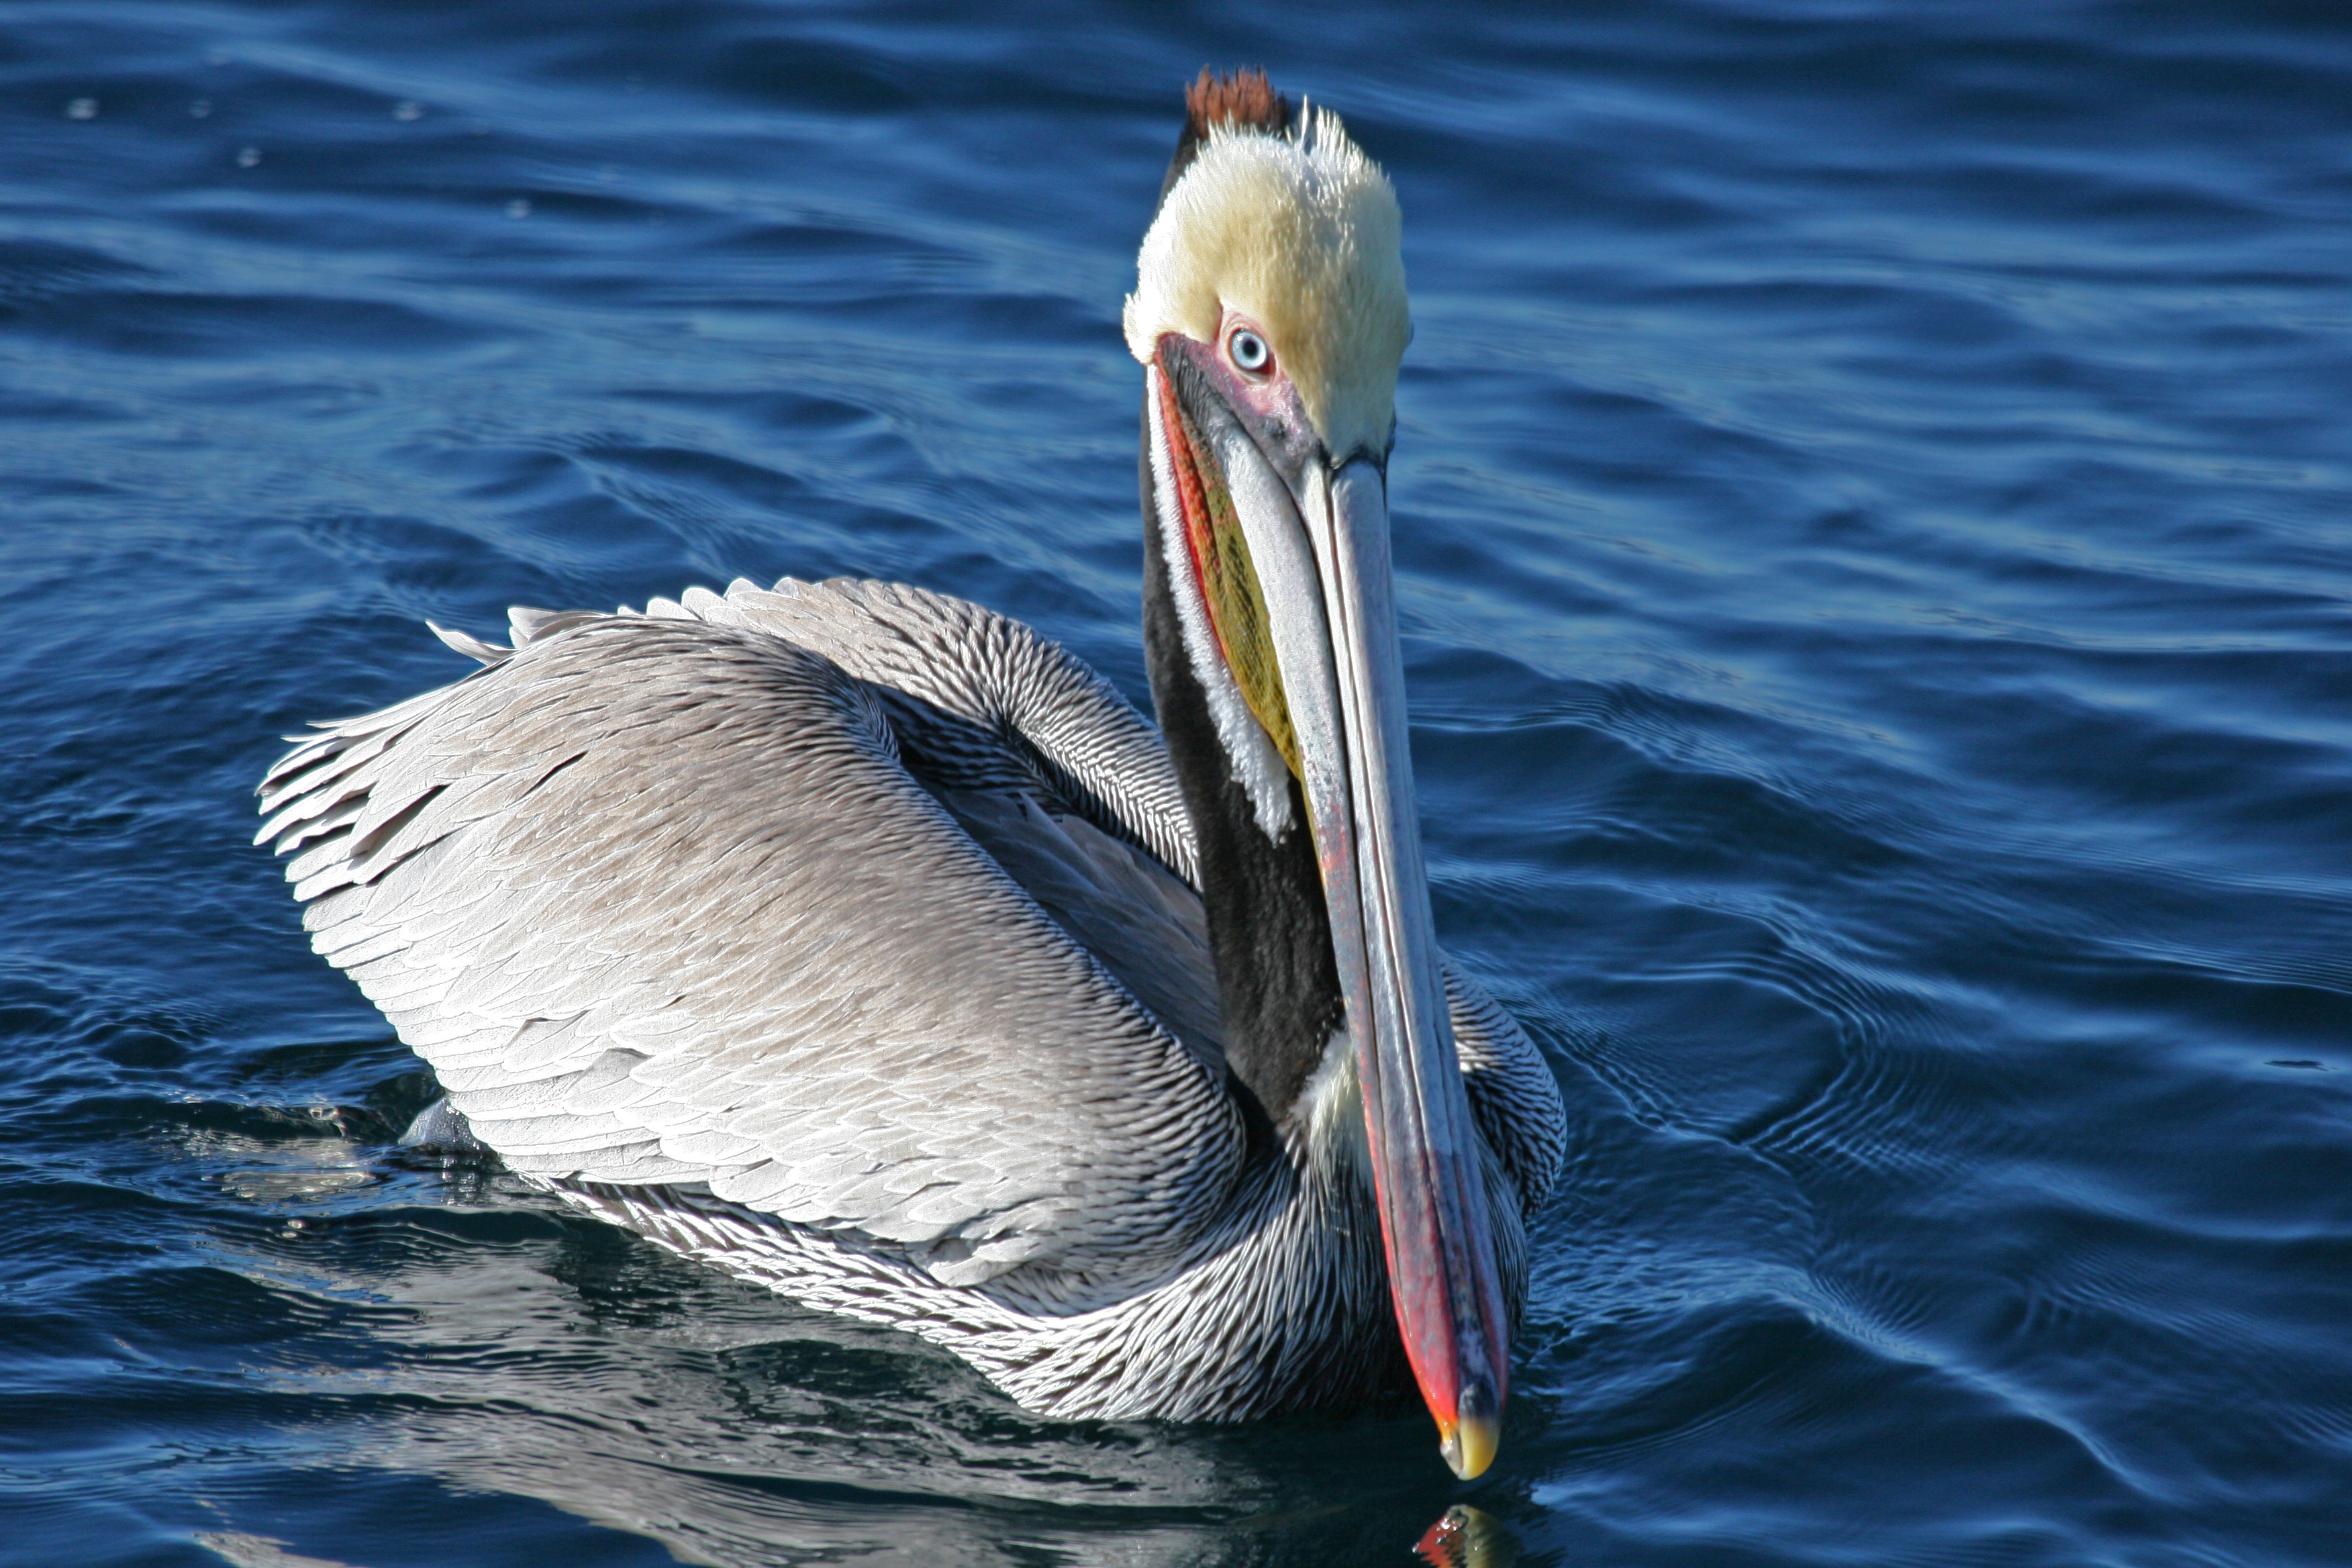
Photo © Mike Baird
(click thumbnail above to see full-sized version)
Brown Pelican -- Port San Luis, CA,
by Mike Baird
1024x768 wallpaper version
1280x1024 wallpaper version
1920x1200 wide-screen wallpaper version
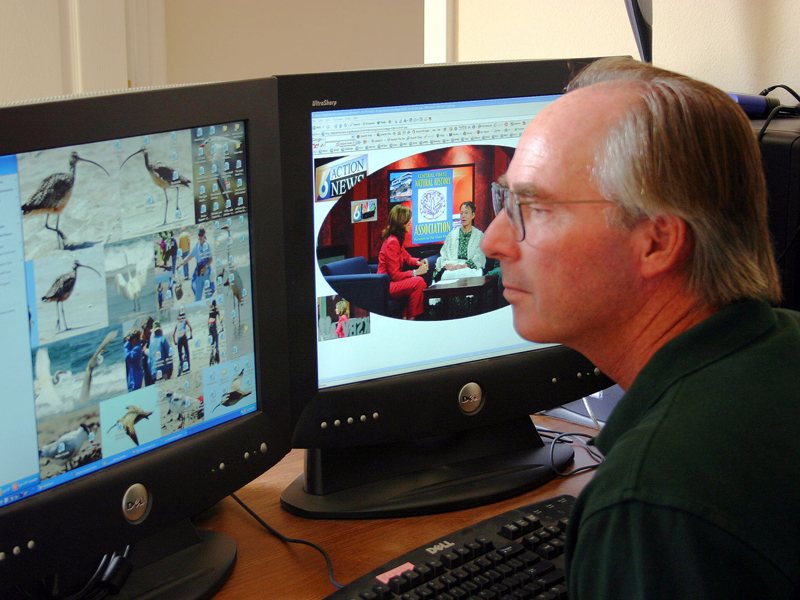 Docent
Mike Baird
interviewed the photographers and edited
this article. He is a retired computer scientist,
author, and entrepreneur from
ask.com, who left Silicon
Valley six years ago. He studied photography during the last six years, but considers himself to be a
beginner -- especially when compared to the astounding array of talent
featured above.
Mike says, "I am interested in photography combined with innovative
uses of the Internet to educate the public, promote conservation (morro-bay.com),
and to facilitate communication within the docent community, and to
create and preserve intellectual property associated with docent
activities (docents.info).
You can find my local nature photos by going to
bairdphotos.com.
Here, you can learn how to upload and
share your own photos online for free. I frequently provide free
photographic services and technical assistance to the CA Central Coast
State Parks docent community and the
CCNHA. No matter
how good a photo you take, I think it can be improved and be made closer to
reality (or into an artistic distortion of reality, if that is your
pleasure), through the use of proper photo enhancement and normalization
techniques. Convention dictates that photos 'manipulated' beyond
what could have been done in a chemical darkroom of the past, are best
annotated accordingly. Improving your technique minimizes the
need for enhancements. However, many handheld shots are not
going to be perfectly parallel to the horizon; a shot perfectly
focused on the eye of your moving subject may, by necessity, be
mal-composed by being in the
exact geometric center of the frame, but such defects are
often easily corrected in Photoshop or similar software. Sometimes
you get lucky, as with my photo here, taken handheld from a moving boat, entitled
Brown Pelican -- Port San Luis, CA. This 8.2 megapixel
photo (3504x 2336) required no cropping or straightening and used every
pixel that the Canon 20D camera had to offer. Every serious photographer
should acquire Photoshop and learn how to do cropping, basic image
contrast and levels enhancement, and sharpening. Computer
techniques complement photographic skills, and the sum of the two bests
either approach. Shoot
using the highest resolution and image quality settings your camera
supports (RAW if you have it).
Good basic equipment (camera body/sensor, lenses, tripod, etc.) does
make a difference. Good equipment does not make a professional, but a professional photographer needs
reasonably good equipment.
Like many of the other photographers interviewed here, my basic set-up is all Canon -- a 20D or 5D body with either the
100-400mm IS zoom, 300mm f/2.8 IS Telephoto paired with a 1.4X or 2.0X
extender, or the 28-135mm IS zoom, and preferably with a tripod or
monopod. I recommend that beginning photographers consider the new
10.1 MP Canon XTi camera with EOS
Integrated Cleaning System -- around $900." You can contact Mike Baird at mike at
bairdphotos dot com.
Docent
Mike Baird
interviewed the photographers and edited
this article. He is a retired computer scientist,
author, and entrepreneur from
ask.com, who left Silicon
Valley six years ago. He studied photography during the last six years, but considers himself to be a
beginner -- especially when compared to the astounding array of talent
featured above.
Mike says, "I am interested in photography combined with innovative
uses of the Internet to educate the public, promote conservation (morro-bay.com),
and to facilitate communication within the docent community, and to
create and preserve intellectual property associated with docent
activities (docents.info).
You can find my local nature photos by going to
bairdphotos.com.
Here, you can learn how to upload and
share your own photos online for free. I frequently provide free
photographic services and technical assistance to the CA Central Coast
State Parks docent community and the
CCNHA. No matter
how good a photo you take, I think it can be improved and be made closer to
reality (or into an artistic distortion of reality, if that is your
pleasure), through the use of proper photo enhancement and normalization
techniques. Convention dictates that photos 'manipulated' beyond
what could have been done in a chemical darkroom of the past, are best
annotated accordingly. Improving your technique minimizes the
need for enhancements. However, many handheld shots are not
going to be perfectly parallel to the horizon; a shot perfectly
focused on the eye of your moving subject may, by necessity, be
mal-composed by being in the
exact geometric center of the frame, but such defects are
often easily corrected in Photoshop or similar software. Sometimes
you get lucky, as with my photo here, taken handheld from a moving boat, entitled
Brown Pelican -- Port San Luis, CA. This 8.2 megapixel
photo (3504x 2336) required no cropping or straightening and used every
pixel that the Canon 20D camera had to offer. Every serious photographer
should acquire Photoshop and learn how to do cropping, basic image
contrast and levels enhancement, and sharpening. Computer
techniques complement photographic skills, and the sum of the two bests
either approach. Shoot
using the highest resolution and image quality settings your camera
supports (RAW if you have it).
Good basic equipment (camera body/sensor, lenses, tripod, etc.) does
make a difference. Good equipment does not make a professional, but a professional photographer needs
reasonably good equipment.
Like many of the other photographers interviewed here, my basic set-up is all Canon -- a 20D or 5D body with either the
100-400mm IS zoom, 300mm f/2.8 IS Telephoto paired with a 1.4X or 2.0X
extender, or the 28-135mm IS zoom, and preferably with a tripod or
monopod. I recommend that beginning photographers consider the new
10.1 MP Canon XTi camera with EOS
Integrated Cleaning System -- around $900." You can contact Mike Baird at mike at
bairdphotos dot com. *** end of printed version of
article ***
*** Some of the following material could appear as "sidebars"
in
CCNHA
Nature Notes if more material is desired by the editor ***
- Always have your camera with you and ready to take an opportunistic photo.
- Be patient and spend more time in the field.
- For wildlife, get closer, and set focus on the subject's eyes.
- Lead a moving subject so that there is space in front of it. To the extent that you were not close enough when you took the picture, or in haste you had to set focus at the center of the frame, you can frequently post-process your image and crop it to achieve this effect.
- Capture action or movement by using your burst mode to get a sequence of images to pick from. The days of high film costs are over, and it costs nothing but time to take more pictures.
- Be aware of the background -- does it enhance or detract from your subject?
- Look for interesting reflections in water.
- Get the sun behind you -- maximize the light on the "face" of your subject.
- Use your flash to "fill" shadows, even in bright daylight.
- Steady the camera with some kind of support (tripod, monopod, tree, strap...).
- Set your camera to record at maximum resolution and quality -- use RAW if your equipment supports it. Use the optical zoom capabilities of your camera, but forget the "digital" zoom which simply replicates pixels.
- Shoot small subjects from a low angle... consider a wide-angle lens for effect.
- Compose the image into "thirds" so that not all images are centered. Again, you can frequently post-process your image and crop it to achieve this effect.
- Use "vertical" shots for appropriate subjects.
- Getting Technical: Use the fastest shutter speed possible. One rule-of-thumb is that shutter speed should be equal to or faster than the ratio one over the focal length of your lens -- i.e., if you are using a 200 mm lens, the slowest shutter speed should be 1/250th of a second. Of course you can overdo it -- shutter speed comes at the expense of depth-of-field (aperture setting) and ISO "film" speed (which will effect graininess). Try to keep the aperture setting at the numerical value of f/11 to f/16 or even higher, and ISO speeds at the numerical value of 400 or lower. Another rule-of-thumb is that shutter speed should be about one over your ISO, so, if your ISO is set to 400, your shutter speed would be 1/400th of a second. Obtaining good depth-of-field, for many scenes, will make the difference between a good shot and a snapshot. The higher you set the f-stop numerical value, the smaller will be your lens aperture opening, and the greater will be the depth if field. An exception -- when your subject deserves to be the central focus of your image, and you want the background to be blurred, shoot it at f/5.6 or f/8.
- Invest in higher quality camera and optics, and Photoshop software, if you find yourself enjoying photography.
Join these Local Yahoo! Groups and Camera Clubs
- The Photo Morro Bay Yahoo! Group at photomorrobay.com is where a few photographers in and around the Morro Bay, CA area share photos and ideas, schedule informal events, and post news items related to their photography hobby or avocation. Everyone welcome -- from beginners to experts. Photographers are invited to join the groups.yahoo.com/group/photomorrobay (a shortcut is photomorrobay.com)
- The slocobirding Yahoo! Group is by far the premier discussion group for San Luis Obispo County birds. Topics include county rarities, early and late migration times, and birds seen in the field. Also welcome are identification issues, and announcements of upcoming field and pelagic trips. Please limit your discussions to San Luis Obispo county. groups.yahoo.com/group/slocobirding
- slocameraclub.org's SLO Camera Club, San Luis Obispo, CA
- SLObytes.org's Digital Photography Special Interest Group San Luis Obispo, CA
Good Books on Photography
Good Magazines on Photography
Other Online Resources
- Nature Photographers Online Magazine is the official website of the Nature Photographers Network™, an international cooperative network of amateur and professional photographers dedicated to the art and technique of nature, wildlife and landscape photography. Learn more about NPN.
- luminous-landscape.com has great product reviews tutorials and more
- Professional photography with Microsoft Windows (a Microsoft resource)
- Photo.net's "Learn" A Guide to Nature Photography Nature primer includes answers to typical questions
- Wikipedia the free encyclopedia that anyone can edit, has surprisingly good and constantly improving content related to all aspects of photography. E.g., searching on Photography, for example, yields basic materials and tables of related contents and categories
- Additional bookmarks for interesting or educational places to visit regarding photography